
Basic Rendering Tutorial
References: Render to File & Render State Panels
Related Tutorial: Advanced Rendering Tutorial
Article: Advanced Rendering - Pausing, Resuming, & Recharging Your Images
Start with a Good Fractal - Open its Preview window
From the Welcome Screen or Variants Editor, you can open the preview window of a fractal's thumbnail in one of four ways:
- Click on the
 button.
 - Press the Enter key
- Double click on the thumbnail with the mouse.
- Right click with the mouse to open the thumbnail's menu and select View Selected Frame in Preview...
Rendering the Image
Rendering an image saves the image to a file type of your choice, so it can be used outside of Fractal Architect 2.
Use the menu item File => Render Image to File... to open the Rendering window.
Basic Render Settings
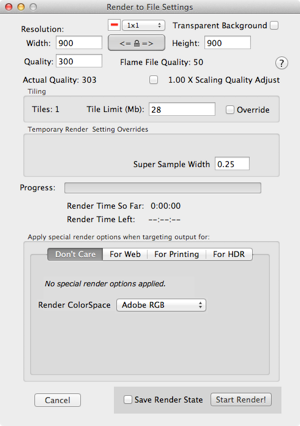
To render to file, the only required items are the image width, image height, and rendering quality. The width and height fields change together if the Aspect Ratio is locked. Click on the Aspect Ratio button to release the Aspect Ratio lock which allows you to edit height and width independently of one another.
If you are creating a high quality image, make sure you check the Save Render State checkbox. It's right beside the Start Render button. Keeping the complete render state around lets you add more render time to improve the image quality and fine tune the post-processing parameters.

The Quality text field is very important. The time to render an image will depend on the image quality set here. Quality is a measure of the times each pixel in the final image is re-calculated, ensuring image precision.
The output image's quality (clarity and lack of haziness) also depends on the Quality setting. Some fractals benefit from high quality values more than others. You might try to render the same image at both a quality of 300 and 1000, to see if a high quality image would be appropriate.
Hint: You can save the Render State to cut down on the time needed to render the 1000 quality image after rendering the 300 one, since rendering to 1000 quality is essentially the same as adding 700 re-calculations to the original 300 quality image. This is called incremental rendering. To save the Render State, check the Save Render State checkbox.
Render ColorSpace
Fractal Architect allows you to set the colorspace for the rendered image. The colorspace has a big impact on the apparent color saturation of the final image.
For more information on colorspaces, see: How are ColorSpaces used by Fractal Architect?. My personal favorite setting is AdobeRGB
Starting the Render
Just press the Render! button.
You will first be asked for the image type, which can be:
- PNG file
- JPEG file
- TIFF file
- JPEG-2000 file
- BMP file
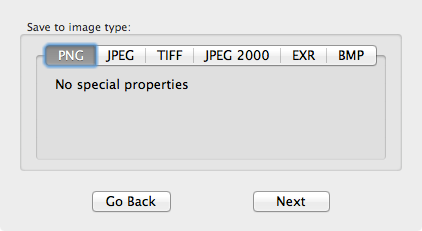
Next you will be asked for the location and name of the file that will contain your final image.
Once the render is done, the finished image file will open in Fractal Architect so you can inspect it.
If you had checked the Save Render State checkbox, you will now be shown the Render State window for your fractal, which allows you more options if the finished image is not to your liking. More information can be found on that here: Advanced Rendering Tutorial.
Thats it!
Pausing and Resuming the Render the Next Day
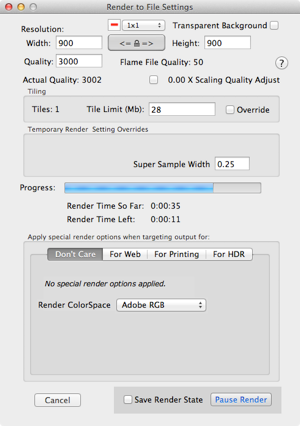
While the image is being rendered, it's possible to pause (not cancel) the render. At this point, the render state is saved to a file which can be opened in the future when you want to resume rendering.
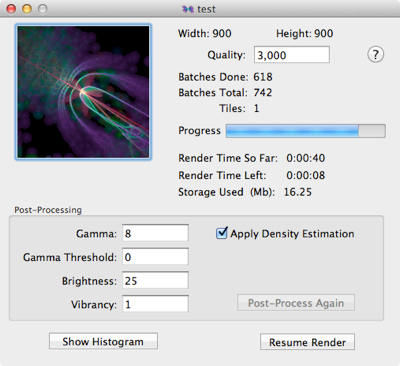
To pause the render, click the Pause Render button. If you did not check the Save Render State checkbox at the start of the render, you will be asked where to save the Render State file. After you've chosen a location, the Render State window will open.
If you want to resume the render the next day, you just close the new Render State window. If you want to continue rendering right now, you can restart the render by clicking the Resume Render button.
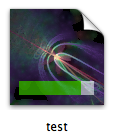
How the Render State file looks in the finder
Resuming the Render the Next Day
Open the render state file you saved the previous day by clicking on it in the Mac Finder. This reopens the Render State window. Click the Resume Render button. The render will resume.
In this tutorial, we did not choose to Save the Render State when the render was originally started. Because of this, you cannot add more quality.
The next tutorial shows how to add more render quality and tweak render post-processing.