Exhibition Image Rendering
Exhibition images are large, high quality renderings of your fractals. These are images you want to mount in a frame and put on the wall of your home.
Reference: Render to File Panel
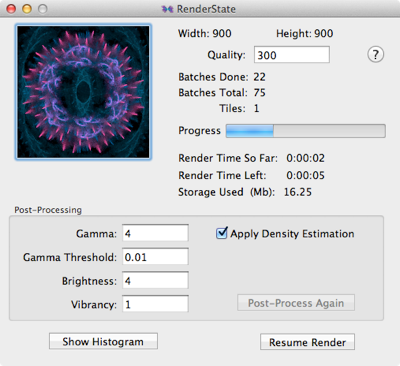
Reference: Render State Panel
Key Issues with Exhibition Images
Image Size and Tiling
Exhibition images are large and can require lots of disk space to store. Your system also has limited memory capacity to render and process large images. So how does Fractal Architect handle huge images? Very large images are broken up into smaller tiles that are rendered separately and combined to create the final image.
If you render on the GPU, you get a huge increase in rendering speed, but often the GPU has significantly less memory than is available on your CPU.
Tiling - Why its Important
Tiling reduces the memory needed to render an image. You have the option of overriding the automatic tiling and increasing the number of tiles. This is done indirectly as you state the maximum amount of rendering memory to be used for rendering. Fractal Architect will calculate the correct tiles that can be rendered to based on this rendering memory limit.
Why would you want to do this? You might want to prevent the render from grabbing most of your free memory.
Does Tiling Create Visible Artifacts
No. If you render at low quality and use Density Estimation, you might be able to find the tile seams - maybe.
Render Quality - How to know when you are done
Every fractal is a bit different. There is no set Render quality that will work for all fractals. When you can no longer see the improved image quality from higher render quality, you are done. But how do you do that?
Fractal Architect supports saving the complete Render State to disk (but only when rendering the fractal image to a file). Having this render state implies the render can be restarted with a higher quality setting. Since it has the prior render state, the fractal can be rendered in incremental steps.
One note: the render state is 5 times larger than the final rendered image. You can overwrite the render state produced for other fractals (but of course, you wont be able to resume the render for those other fractals).
Special Case: Zoomed-in Fractals
The Flame algorithm needs to do more iterations to produce the same visual quality, when you zoom into a small portion of the fractal visible area. In fact, it needs to render “magnification squared” longer to achieve the same render quality. (So if you zoom in by 2X, you must render 4X as long.)
Rendering Workflow
So the rendering workflow is this:
* Select the image size and initial render quality.
* Important: Click on the Save Render State checkbox (next to the Start Render button).
* Repeat till satisfied:
- Render the image.
- Inspect the image. Is it good enough or does it need more rendering quality?
- Increase the quality setting (recharge the quality). Resume the render.
Render Time
The combination of high render quality and large image sizes produce long render times. Use the GPU renderer to reduce that render time.
A rule of thumb is that the render time is proportional to:
render quality X image width X image height
Post-Processing
The rendering algorithm creates a histogram of hits with color information. The post-processing portion of the render algorithm converts this histogram to the final image.
If you have the complete render state, you can elect to change just the post-processing parameters and post-process the histogram again and again, till satisfied. The post-processing step by itself is very fast.
Further Editing With Photoshop, Pixelmator
Don’t forget that the image can always be furthered edited in an image processing app to improve it. Always create a great rendered image, as you cant add to the render quality in an image processing app.
Reminder: Save Render State - Always
If you don’t have complete render state, you cannot add render quality later on nor can you fine tune the post processing parameters.
There is a new Fractal Architect Preference item under the File Output tab: Always Save Render State.
Special Rendering Support
Pause & Resume
After you start a render, the Pause Render button stops the render and saves its render state to disk. The Render State window opens, which allows you to resume the render right away if you choose to.
Later in the future, you can open the saved render state file and resume the render then. Pausing a render, which did not elect to Save all rendered state, only saves partial rendering state. (Exception: a smaller image requiring only a single tile to render, has the complete render state if it is paused.)
Complete versus Partial Rendering State
If an image is rendered with multiple tiles and the render state for every tile is saved, then you have complete render state. If you the render state for only one tile is saved, this represeents partial render state.
With complete render state, you can not only pause & resume the render, you can recharge the quality (add more) and restart the render. You can also repeat the post-process step with different parameters.
With partial render state, you can only resume a paused render. There is not enough render state information to increase the render quality later. (Of course, you can repeat the entire render from scratch with a higher render quality setting.)
Recharge Rendering - Adding more Quality
Note:Recharging quality needs complete render state. If there is only partial render state, the quality field will be disabled and the Resume Render button is disabled.
Open the saved render state file for the fractal. Edit the quality text field and increase its value. Hit the Enter key to tell the app that the quality field has been edited. This will enable the Resume Render button and update the Progress Bar for the new quality setting.
Click on the Resume Render button and the render resumes. It will render as long as needed till the total quality reaches the new target value.
The whole point of recharging quality is incremental rendering, starting from the prior rendering state. It saves you time by not having to re-render from scratch.
Fine Tune Post Processing
Note:Post-processing needs complete render state. If there is only partial render state, the Post-Process Again button is disabled.
The Post-Process Again button post-processes the histogram again using the parameter values you set (on the Render state window - not the Triangle Editor).
Post processing uses these parameters:
* Gamma
* Gamma Threshold
* Brightness
* Vibrancy
* Density Estimation Enable/Disable
Recommendation: Try setting Gamma Threshold to zero and turn off Density Estimation. Tweak the gamma and brightness values to get optimal contrast and image brightness.
Still need Density Estimation?
High quality renders don’t usually need density estimation filtering. Density estimation can add visible artifacts (density estimation bubbles) in low density areas.
A low density area is a part of the image where the histogram hits are near 0. Use the Histogram viewer to find these areas. On the histogram, low density areas are shown as very dark in color.
Use and Abuse of Gamma Threshold
Gamma threshold can be applied using very small postive values (like between 0. and 0.01). Gamma threshold values greater than zero tend to hide low density portions of the fractal. The amount of hiding is proportional to the gamma threshold value. Tweak to taste.
Use the Histogram to Diagnose Rendering Issues
The histogram can be considered the “film negative” of the Flame algorithm. It contains all of the information needed to produce the final image. Rendering quality and the hit values in the histogram are related.
See: Histogram Panel
You can inspect it to see if you need more render time. The dark areas of the histogram are low density (hit counts near zero). Similar to digital photographs, rendering noise (sampling error) is most significant in the low density areas. Rendering longer decreases this sampling noise. Depending on the fractal, rendering longer may convert noisy low density areas into medium density.
Finder Icons for Saved Render State Files
The Finder shows a rendered icon for the render state files. The only difference from a normal fractal document, is the progress bar is included. So if you have paused a render in the middle of the render, the progress bar will show qualitatively the overall render progress.
Special Tip - Selective Blurring - Reducing Fractal Detail
This may sound strange, but often you can improve a fractal image by reducing the visible detail of the fractal. Reducing fractal detail is done using the Triangle Editor or Variants Creator. The trick is to add a very,very small pre_blur variation weight to one or more of the fractal’s transforms.
You can use a Mix-in variant to add a very tiny amount of pre-blur to the transform(s).
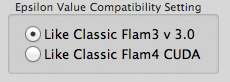
Epsilon - Flam3 versus Flam4 Usage of Epsilon
Flam3 in many but not all variations uses a technique to prevent division by zero. They add a very small positive number (epsilon) to any value that is used as a divisor. In later variations that were added to Flam3, usage of epsilon was discontinued. This value DOES effect the appearance of a fractal occasionally.
Flam4 CUDA did not use this technique (it allows division by zero) and therefore the appearance of some fractals is different.
Fractal Architect can emulate either Flam3 or Flam4's usage of epsilon. It is a Preference setting.
On the Preferences > Render Options tab is the Epsilon Value Compatibility Setting. Choose either Flam3 or Flam4.