Animated fractal videos are created from a very large sequence of fractal images. A typical video is played back at 30 frames per second. A 5 minute video has 9,000 separate fractal frames in it !
Very Important: Learn how to make Plain Old Fractal Images First
If you want to make animated videos with fractals, please make sure you can make fractal images first, as they are the basis of any animations you create. Animating fractals uses many concepts that build on top of the basic fractal creation process.
Its all About the Keyframes
Fractal animations are based on a sequence of keyframes. A 5 minute animation, even though it is created from 9000 separate images, might only have 20 to 30 separate keyframes. These keyframes are created by you as ordinary fractal images and then are arranged in time sequence using the Animation Sequencer.
So before you can create an animation, the first step is to create a collection of keyframes. These keyframes can be created everywhere in the app except of course the Sequencer itself.
The Keyframes window can be accessed from the Preview window’s Frames button.
For your first sequencer, we recommend that you use just 2 or 3 keyframes.
Opening the Sequencer Window
A single fractal file can have 1 or more different sequences. Sequences are stored in the same file as the rest of the fractal information (so the all important keyframes are kept with the sequencer layout).
The Sequence Selector Window can be opened from:
Preview window’s Open Sequence Selector button .
Keyframe window’s Open Sequence Selector button .
Sequencer’s All Sequences button.
Open the Sequencer Selector Button
You can create new sequences or open existing sequences with the Sequence Selector.
Let’s start with the easiest way to create a basic animation sequence. We will introduce the full power of the sequencer in steps.
Creating a Basic Keyframe Morph Animation
First, open the Sequencer Selector, then click the Basic Keyframe Morph - All Keyframes button.
This opens a new Sequencer window, holding a basic keyframe morph animation.
This type of animation morphs each keyframe with the next one (the last one morphs to the first.)
A morph is an operation where the 1st fractal is slowly changed into the 2nd one by interpolating each and every parameter. By permuting(rearranging) which transforms from fractal 1 are interpolated with those in fractal 2, you can get different morph animations.
This style of animation was popularized by the Chaotic app.
Creating a Basic Loop/Morph Animation
First, open the Sequencer Selector, then click the Basic Loop/Morph - All Keyframes button.
This opens a new Sequencer window, holding a basic loop morph animation.
For 2 keyframes, A and B, 4 animation segments are created. The segments do this:
“loop” keyframe A
morph keyframe A into keyframe B
“loop” keyframe B
morph keyframe B into keyframe A
A “loop” animation rotates the transforms(triangles) of the keyframe. For some fractals, this looping animation can be very appealing.
This style of animation was popularized by the Electric Sheep project.
Creating a New Blank Sequence
The first approaches are very simple and easy to do. After gaining experience with those two techniques, you might want to create your own animation by adding arbitrary keyframes to a sequence.
First, open the Sequencer Selector, then click the New Blank Sequence button.
This opens a new sequence with a single empty animation segment. With that blank animation segment, you can:
Add a two keyframes by dropping two different fractals on the Keyframes thumbnails. This will create a morph animation from the first to the second.
Add a single keyframe by dropping one fractal on the first Keyframes thumbnail.
Dragging/Dropping or Copying/Pasting Keyframes
Throughout the app, you can use mouse drag&drop or keyboard copy/paste to add/change a target fractal thumbnail. With the Sequencer, you use it to change the keyframes for a particular animation segment.
Sequences can have One to Many Animation Tracks
An animation sequence is comprised of one to many animation tracks.
Each animation track is comprised of a series of non-overlapping animation segments.
Each animation segment represents a bundle of zero to many simultaneous parallelparameter animations.
The location/duration of animation segments in a single specific track can overlap the animation segments in other tracks.
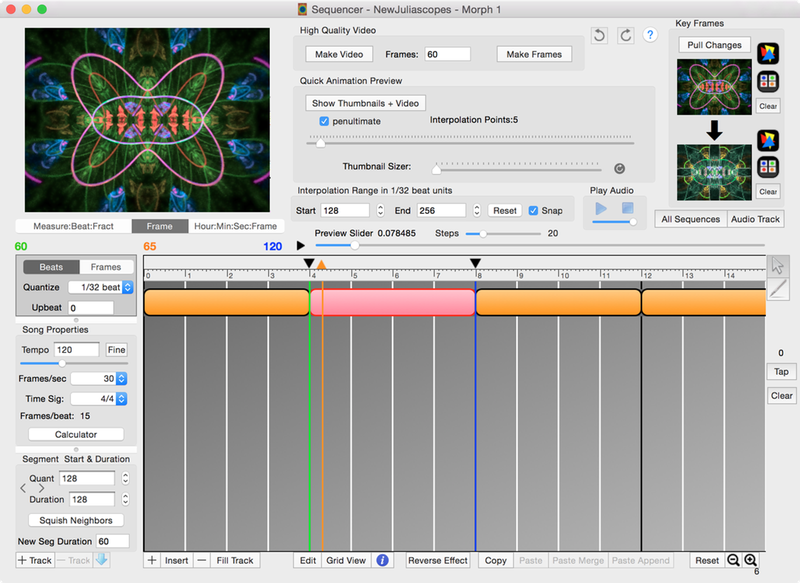
The top orange track is the keyframe track. Its purpose is to hold the keyframe animation segments which provide the “base” fractal for each video frame.
In the case of a simple “looping” animation, the “base” fractal is the original unrotated keyframe. The “looping” animation is an operation that rotates each transforms’ pre-matrix.
For a morphed keyframe segment (one that has two different keyframes), the “base” fractal for each video frame is computed by the morph (interpolation) for the first keyframe into the 2nd keyframe. The interpolation amount (a fractional value between 0 and 1) is calculated by the video frame number divided by the number of video frames covered by that animation segment.
Keyframe Track/Segment Restrictions
There can be no gap between animation segments. Every video frame must be able to determine its “base” fractal.
Each keyframe segment must have either 1 or 2 keyframes (those keyframes can be used by other keyframe segments too.)
Understanding Non-Keyframe Track/Segments
Yellow tracks hold animation segments which specify zero to many individual parameter animations. Each parameter animation is applied to the video frame’s fractal in turn. The “base” fractal is create first, then the parameter changes for each parameter animation are applied in turn to that fractal.
Most parameter animations affect one distinct parameter and can be applied in any order. There are exceptions to this, so using multiple animation tracks allows you control over which animations create the “final” parameter value.
For example, to control the view camera for a video frame, it is best to put the view camera location/orientation animations into its own animation track and its easiest to also use a single animation segment for that track which covers the entire video duration. (You would typically create a spline animation curve to control the camera over the entire video.)
Without this approach, it would be very difficult to do smooth camera animation across two different segments.
Understanding Layered Animations
For each video frame, the animation engine first creates the “base” fractal from the keyframe segment. Then any parameter animations included in the keyframe segment is applied to that fractal.
Next any animation segments that intersect the video frame location are applied, in turn, from top to bottom. After the bottom segment’s animation is applied, the fractal is rendered to create that video frame.
The top-to-bottom ordering of animations determines each parameter’s “final” value.
(Inside a segment, the order of application can be seen by the Grid View [a tabular view] or the Segment Info popover’s table view).
Arranging Sequencer Tracks and Segments
Please follow this link to learn how to add/remove/position/resize Sequencer Tracks and Segments:
The best usage of fractal animation in the eyes of many users is to create entertaining music videos. Compared to hiring a professional video production company, using fractal animation for music videos, is extremely inexpensive.
Setting up Song Parameters
The initial release of the Fractal Architect Sequencer only supports a single tempo per sequence. Future updates will provide a Tempo Track to better work with live performances where the tempo changes through a song.
The Song Properties allow you to set up these music related parameters:
Tempo (including Tap Tempo)
Time Signature (Beats per Measure)
Video Frame rate
Tempo can be determined by using Tap Tempo or by lining up the vertical beat lines with the audio waveform.
The location and duration of each animation segment can be specified in one of two units:
Beats (optionally quantized as fractions of a beat)
Video Frames
Locator Units
Locators (blue and green) are used to specify the time interval for video previews and high quality video rendering. The orange locator shows the time position of the current video frame shown in the fractal preview thumbnail.
You can drag the Preview Slider to change the time location for the preview thumbnail.
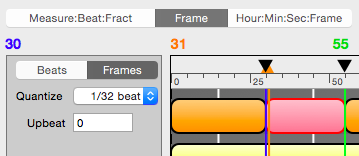
You can choose to see the Locator positions in one of
1. Measure : Beat : Video Frame
2. Video Frame
3. Hour : Minute : Second : Video Frame (SMPTE time code)
Previewing Your Animation
Selecting which parameters to animate is a big challenge. Typically you pick a parameter at random and just make changes to its value. Next, you do a preview animation to see whether both the parameter you chose and the values you picked make an effective animation.
First, you select a portion of the total time range for your video preview. The idea here is to just preview a small number of video frames to see if the animation is promising.
Green and Blue Locators
The green and blue locators establish the range for both preview and final rendering. The orange locator corresponds to the current Preview Slider drag location.
Green and Blue Locators
The locators positions are displayed in 4 different ways:
Drawn as blue, green, or orange vertical lines with a draggable triangle in the Ruler area.
Shown as the Start and End text fields in the Interpolation Range box.
Shown on the Ruler area in either Beats or Frames units.
Shown as blue, orange, and green labels.
Note: The Selector above the labels can be used to change the units used for the locator position labels.
You can change the locator positions by:
Dragging the triangle at the top of each locator with the mouse.
Typing a new Start or End values in the Interpolation Range box.
If the Snap control is checked, the locator positions will “snap” to the next selected segment.
Preview Slider
Preview Slider
The Preview Slider can be dragged to change the preview fractal thumbnail. The green and blue locator positions set the portion of the timeline that corresponds to the Preview Slider.
The left locator corresponds to the left end of the slider. The right locator corresponds to the right end of the slider.
The orange locator shows the video frame corresponding to the current Preview Slider location.
If you drag the slider slowly, the preview thumbnail will render continuously so you can see the animation.
Preview Play Button
To the left of the Preview Slider is the Preview Play Button. If you click that, the slider will be auto advanced and a fresh preview thumbnail will be done. It will do this over a number of steps, till the Preview Slider is at the full right hand stop position.
The Steps slider sets the number of increments that will render.
Yet More Ways to Preview an Animation
Preview Slider
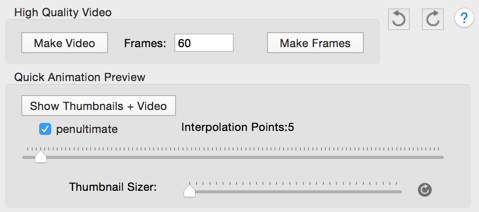
Rendering a Collection of Thumbnails
In the Quick Animation Preview box, set the number of interpolation points to see, then click the Show Thumbnails button. After all of the thumbnails have been generated, you can then click the Show Video button to create a little video with those thumbnails.
Rendering Your Video
Click the Make Video button to open the Video Rendering dialog. Though fine for previewing, for long video renders, it NOT recommended to create your video directly without saving each video frame to an image file first (see next paragraph).
If your render has more than 200 video frames, it is recommended to render first to an Image File Sequence, then create the video later from those image files.
Click the Make Frames button to open the Video Rendering dialog.
Rendering all of the video frames for several minute long video at full HD size can take a long time.
Video rendering can be paused, saved to a Movie Render State file, and resumed at a later time.
Warning: before starting a video render, a complete snapshot of the sequence and all of the keyframes is made. This means that changes made to the sequencer after the video render has been started will not be included in the video render. (Of course, you can cancel the render and start it over again.)
Animation segments contain a bundle of simultaneous parallel animations. The animations are configured with the appropriately named Animation Segment Configurator.
To add/edit animations you can use two very different techniques:
Fractals have many parameters that can be animated effectively
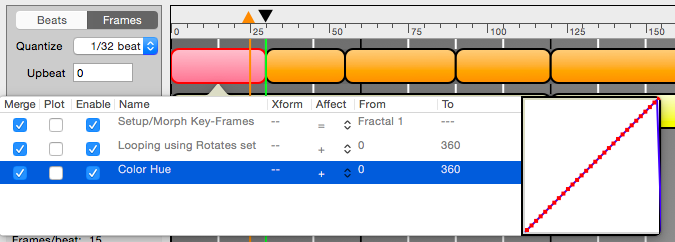
Lets add a Color Hue animation to our sequence.
Select the first segment and double-click on it (or hit the Edit button)
Look for the Color Gradient row in the Outline view. Click on that row, then press its + button - next select Color Hue from the popup list.
Close the Configurator window.
Click the Info button or select Segment Info from the context menu.
So you have just added a Color Hue animation. By default it will have a straight linear animation curve. The Segment Info popover will show that you added a Color Hue animation to your selected segment.
Segment Info Example
Lets preview the affect that animation has on your video.
Now you should see the fractal color in each video frame change smoothly.
If you don’t like the color change affect, just remove that animation from the configurator.
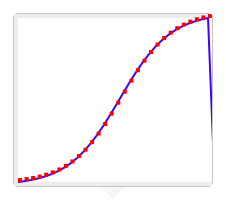
Example: Changing the Animation’s Curve
Animation curves
Open the Configurator for the segment we modified.
Select the Color Hue animation row again.
Now, pick the 3rd animation curve from the left and set the A parameter to 0.574.
That gives a nice Ease Out- Ease In animation curve. If you preview the animation again, you will find now that the color changes slowly at first, then faster, then finally slower at the end.
Segment Info Example
Grid and Track View
To quickly see the animations contained in a segment, you have 3 ways:
Open the Segment Info popover discussed above.
Open the Grid View for the segment.
Open the Configurator.
Grid View shows a table with the animations within that segment.
From the Grid View, you can open the Track view for a particular animation by pressing the Track button.
The Track view shows every segment on that track which uses that specific animation.
Segment and Track Animation Curve Plots
You can see the animation curve for an animation from:
Open the Segment Info popover. Select the row having your specific animation.
Plot the curve from the Grid View window.
Open the Configurator
Segment Info Example
If you click the Plot Track button from the Track view, you will see a plot of that parameter’s animation curve over the entire track.
Example : Add the color hue animation to the next segment
Repeat the above steps for the next animation.
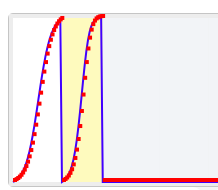
Open Grid View for the first segment, select the Color hue animation row, then click the Track button to open the Track View for that animation.
Click the Plot Track button and you will see this plot:
Segment Info Example
Note the big jump in the animation curve between the two segments. Big changes in a parameter value will appear as a non-smooth change in the fractal’s appearance.
OK, we have been playing with Color Hue which is a cyclic animation, so for this particular example, the sudden jump from 360 to 0 degrees will be smooth since at 360 degrees the animation affect is the same as 0 degrees.
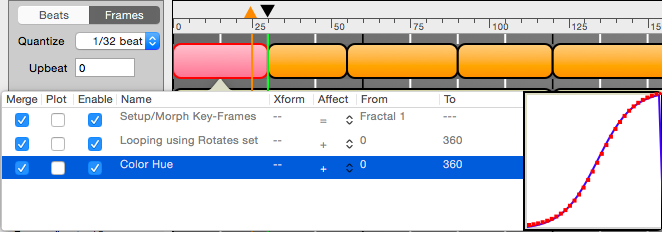
Example : Mirroring an Animation Curve
Lets fix that.
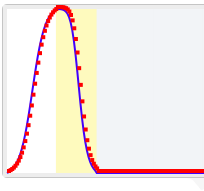
Open the Grid view for the second segment.
Select the Color Hue animation.
Now change its Curve Mode from Normal to Mirrored.
Notice the Track Plot looks very smooth now without any big changes in value.
Segment Info Example
Using Preview Thumbnail Info Window
The Preview thumbnail has a context menu that allows you to get Fractal Info for thumbnail at an arbitrary Preview slider setting.
This allows you to check that the animation curve and interpolated values are as you designed.
Zooming the Display
Hour:Minute:Second:Frame
You can zoom the Sequencer display using the Zoom controls on the bottom right corner of the window. The zoom setting determines how wide animation segments are.
You can add an audio track to a sequencer by clicking the Audio Track button.
Its waveform can be optionally displayed on top of the Sequencer display. You will definitely need to see the waveform when creating Beat Pulsing animations.
Audio Track Setup
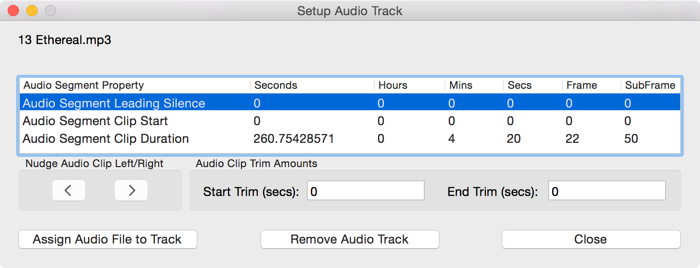
Trimming Out Leading Silence
Many audio files have about 1 second of leading silence. In the Audio Track window, use the Start Trim text field to enter the amount of leading silence to trim. Make sure the waveform is visible in the Sequencer when you do this, so you can see the amount trimmed (it is easy to trim too much). If you trim too much, just enter a smaller fractional seconds value in the text field and try again (its a non-destructive edit).
Audio tracks may be trimmed and precisely positioned relative to the video. Trimming done here is never applied to the original audio source material. Fractal Architect only has read-only access to the audio media files.
Audio Segment Leading Silence
Let’s you add leading silence (to delay the audio start relative to the video).
Audio Segment Clip Start
Let’s you use a smaller portion of the audio clip. This is the offset to the beginning of the audio clip portion.
Audio Segment Clip Duration
Let’s you use a smaller portion of the audio clip. This is the duration of the audio clip portion.
Nudge Audio Clip Left/Right
Click the buttons to move the clip a bit to the left or right. You might want to do this to better line up the audio beats with the Measures/Beat lines shown on the Sequencer area.
Beat Pulse Animations
One exciting type of animation is adding movement to the fractal which coincides with the musical beat in an audio clip. This type of animation is often called Beat Pulsing.
Add a Beat Pulsing Track
Rather than add beat pulsing animations to the keyframe segments, it is best to create a new track to hold the beat pulse animations.
Finding an Parameter Animation That Makes the Fractal Move
The idea is to first find some fractal parameter that when modified causes a noticeable change in the fractal. The optimal parameter might be different from keyframe to keyframe.
Typical things you might try to change would be changing a single transform’s weight or changing the weight of one of its the variations. You might create a duplicate fractal file and use the Triangle editor on each keyframe to determine a good parameter to use for beat pulsing.
When you find a good parameter to animate, add a new animation segment, add an animation to that segment for that particular parameter. Make sure the From and To values are different. Position and set the segment’s duration.
Tip: Use the Segment Info popover to turn on Plot for the pulse animation.
That will plot that specific animation’s curve on the top of the segment rectangle. This can be used to line up the peak of the animation segment with a beat line.
Use Animation Curves to Shape the Pulse
When setting up the pulse animation, pick a curve type to use. Set the A and/or B curve values to get a nice curve shape.
If you want your own custom animation curve shape, create it with the B-Spline or Catmull-Spline curve shape editors. Once created, you can Copy the curve and Paste the copy on other spline curve instances.
Be sure to preview the video animation to see if the pulse animation looks good. You might want to tweak theTo value of the animation to increase or decrease the visual animation affect.
The initial Sequencer release version only supports a single tempo per sequence. This restriction might be fine for dance music, especially if the music incorporates a Drum machine.
Music Having a Single Rigid Tempo
For this music, the app provides a way to add multiple animations segments, one per beat, in one simple operation. You can also use this technique for live music that drifts in tempo over time, but expect to have to manually tweak the animation segments’ location for every musical beat.
Step 1: Determine the Precise Tempo of the Music
Use Tap Tempo to determine tempo. Enter tap tempo result into Tempo text field.
Visually check alignment of Audio waveform with Beat lines.
Use Tempo slider to set the Tempo.
At this step it is OK if the beats don’t line up with the audio waveform.
You want the interval between beat lines to coincide with beat interval in audio.
Use Slow Audio playback to determine the position of the beat pulses.
For some types of music, it is very hard to determine position of the beats.
Step 2: Line up the Audio waveform with the Segments’ Animation Curve Peaks
This crucial step makes sure the video animation happens at the correct spot relative to the audio material. Use the Segment Info popover’s Plot setting to show the animation curve for the pulse animation.
Using Fill Track
Once you create the first pulse animation segment, you can use it as a template to fill the rest of the track with pulse segment instances at each musical beat.
Option Dragging to Copy/Paste One or More Segments
If you select one or more segments, you can click and drag on the first segment while holding down the Option key. This is an easy to copy multiple segments on one track. Placeholder segments are shown as you drag. When you drop them, the copied segments are put there.
This technique works especially well for pulse segments as you can see where they will be pasted.
It is recommend that camera animations be placed in their own animation track. That track have a single animation segment spanning the duration of the entire video.
One special trick is to add a second Camera animation track and just add animations affecting the camera’s orientation. These animations should have a + affects setting so that the animation’s output is incrementally added to the camera animation produced by the first camera track.
2D Camera Basics
These parameters allow you to animate the view for 2D fractals.
Fractal > Parameters & Final Xform > Parameters
Fractal Origin - 2D spline path
Fractal Origin - X Coordinate
Fractal Origin - Y Coordinate
Viewport rotation
Viewport rotation about point
Viewport scale
Viewport scale about point
Viewport zoom
3D Camera Basics
3D fractals have a 3D camera which can be animated. You can also animate the 2D properties above as they set the viewport properties also used in a 3D context.
Fractal > Parameters & Final Xform > Camera
Camera Clip Points Behind
Camera Depth-of-Field
Camera Field-of-View
Camera Fly-Thru - 3D spline path
Camera Location X-Y-Z - 3D spline path
Camera LookAt+Location - 3D spline paths
Camera Orientation Yaw/Pitch/Roll
Camera Ortho-to-Perspective Ramp
Camera Ortho/Perspective Checkbox
Camera Pitch
Camera Roll
Camera X Position
Camera Y Position
Camera Yaw
Camera Z Offset
Camera Z Position
The camera determines the scene which is rendered. Think of the fractal as a 3D world with a camera placed somewhere inside it. What the camera “sees” is rendered to the screen.
The two primary parameters is the camera’s location in the fractal world and its orientation - in other words, the spot the camera is looking at. This spot is called the LookAt point. (See below for more info.)
The Fractal Architect 3d camera is upwards compatible with the Apophysis 3D Hack camera.
Limitations of the Apophysis 3D Hack camera
The Apophysis 3D Hack camera was designed for static fractal images. It works well for static images, but is too limited for 3D camera animation.
Fixed Camera Location
Camera is always at center of fractal world
Camera Looks Both Forwards and Backwards
The view is a composite of both the Forward view and the Backward view. It is a Dual sided view frustum.
Ortho-to-Perspective Ramp
Unlike traditional 3D modeling cameras, Apophysis allows projections that are a blend of Ortho and Perspective projections. Ortho = 0.0 and Perspective = 1.0
Fractal Architect 3D Camera
The Fractal Architect camera is upwardly compatible with the Apophysis 3D camera. The app’s default parameter values for its camera are Apophysis 3D Hack compatible. So fractals created with Apophysis 3D Hack will appear the same in Fractal Architect.
The Fractal Architect camera can be placed anywhere in the fractal world. It can be set to only use the Forward view. It has a Field-of-View setting (that is not a good animation parameter).
Orthographic vs Perspective Projection
The Orthographic projection has no sense of depth. Objects far, far away appear the same size as near ones.
The Perspective projection adds the sense of depth. Objects far, far away appear smaller than near ones. We live our lives and see everything with depth. This is the “natural” state for the human viewing system.
Traditionally most 3D flame fractal static images are shown using the Orthographic projection. However for camera animation, the elimination of depth perception is “unusual”.
Most static 3D fractal images use Orthographic Projection + Forward/Backward Dual View Frustum.
Most 3D fractal animation videos should use Perspective Projection + Forward Only View Frustum. That does not mean you should not experiment with other settings.
The camera’s location and orientation are the most important properties to animate. There are more than one way to set these properties.
Here is a look at the possible ways to animate them both:
Combined LookAt + Location Animation
Separate Location & Orientation Animations
Fly-Thru Animation, with Optional Added Orientation Animation
These are explored in further detail below.
Associated Animation Properties
Camera LookAt+Location - 3D spline paths
Camera Location X-Y-Z - 3D spline path
Camera Orientation Yaw/Pitch/Roll
Camera Fly-Thru - 3D spline path
Technique 1: Single Camera LookAt + Location Animation
The easiest way to setup the 3D camera is to use this animation. It provides 2 separate 3D spline curves. One for the camera and one for the camera’s lookAt point.
If you want the lookAt point to be stationary, use the same “from” and “to” values for the lookAt point’s location. Don’t change the default spline curve.
With the 3D spline curve editors, you are creating the path of the camera’s location and lookAt point. Make sure you use the Video animation previewer to see whether the animation you created looks good are needs further tweaking.
Technique 2: Separate Camera Location & Orientation Animations
The first animation will set the path of the camera’s location. It provides a 3D spline editor to create the path with.
Next you can either 1) add a single combined Orientation animation or 2) add separate Camera pitch, yaw, and roll animations. The second approach is more flexible.
Technique 3: Single Camera Fly-Thru Animation
This special animation category has you creating a path for the camera’s location. The animation will then automatically set the camera’s orientation to look froward along the camera’s path. This is common camera approach for video game programming, and might work well for fractal animation. But as always use the Video animation previewer to make sure it looks good.
You optionally might want to add a separate camera orientation animation that would add a orientation change to the automatically calculated orientation. Make sure you set the How Value Affected property to +.
3D Spline Curves
These curves create the “path” of the camera’s location or lookAt point used by the animation. See this reference to learn how to use the editor.
Open the Sequencer Selector Button