The Sequence Selector allows you to select an existing sequence to view or edit it in the Sequencer.
Open the Sequencer Selector Button
: This opens the Select a Sequence dialog.
You can open the Sequencer Selector from either:
the fractal’s Preview window or
from the fractal ’s Keyframes window (opened by clicking the Preview window’s Frame button).
When opened from the Keyframes window, you can select a subset of the keyframes in the Keyframes window
.
The Sequence Selector will then offer to create either a new Keyframe Morph or Loop/Morph with just those selected keyframes.
Sequence Selector
This window allows you to create new Sequences or to open a Sequencer Editor window to edit a specific sequence. You can also create new selections too.
Sequences are stored
Sequences are stored inside the fractal file, so the keyframes and sequence definitions are kept together. You can also save a sequence as a Sequence Template, which is saved as its own file.
Variation Set Selector
Select one of the keyframe groups (segregated by Variation Set) in the file.
Shows the variation set name and the number of keyframes in the file using that variation set.
Sequence List Box
Shows the existing sequences’ names. Click on the sequence to select it for opening.
Open
Opens a Sequencer Editor to view/edit that sequence.
Duplicate
Duplicate the sequence.
- Button
Remove the sequence. (Not undoable!)
Animation Sequence Name
Editable text field so you can change the sequence’s name.
+ New Blank Sequence
Creates a Sequencer with a blank animation segment. Names the sequence “Sequence n”, with n being a number to make the name unique.
+ Basic Keyframe Morph - All Keyframes
Creates a Sequencer with a just morph animation segments for all the keyframes. Names the sequence “Morph n”, with n being a number to make the name unique.
+ Basic Keyframe Loop/Morph - All Keyframes
Creates a Sequencer with a both looping and morph animation segments for all the keyframes. Names the sequence “Loop/Morph n”, with n being a number to make the name unique.
+ Basic Keyframe Morph - Selected Keyframes
Creates a Sequencer with a just morph animation segments for the selected keyframes. Names the sequence “Morph n”, with n being a number to make the name unique.
This option is enabled when you open the Sequence Selector from the Keyframes window.
+ Basic Keyframe Loop/Morph - Selected Keyframes
Creates a Sequencer with a both looping and morph animation segments for the selected keyframes. Names the sequence “Loop/Morph n”, with n being a number to make the name unique.
This option is enabled when you open the Sequence Selector from the Keyframes window.
+ Load New From Template
Creates a new sequence by loading a template sequence file.
Note: You can save a sequence as a template using the Sequencer > Save As Sequence Template menu item (only available when a Sequence Editor window is open).
Opening an Existing Sequence
Sequence Selector
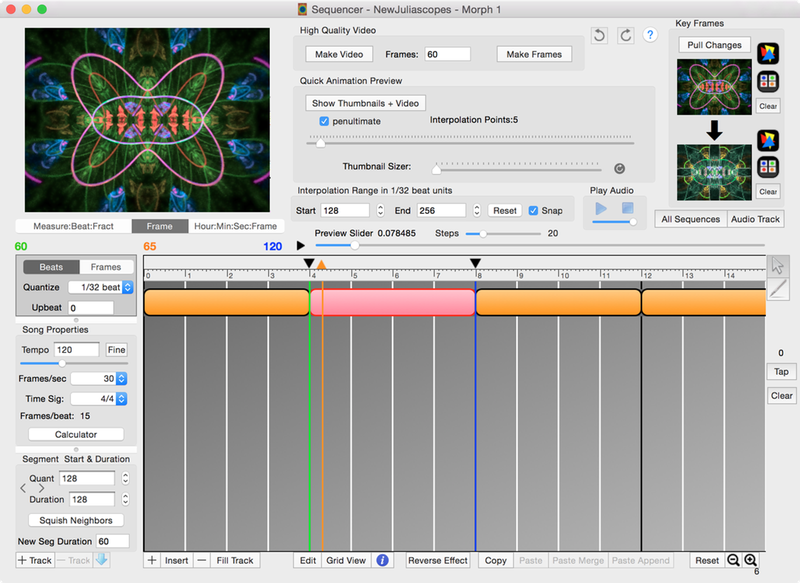
Animation Sequencer
This is an Animation Sequencer view created from a sequence of keyframes.
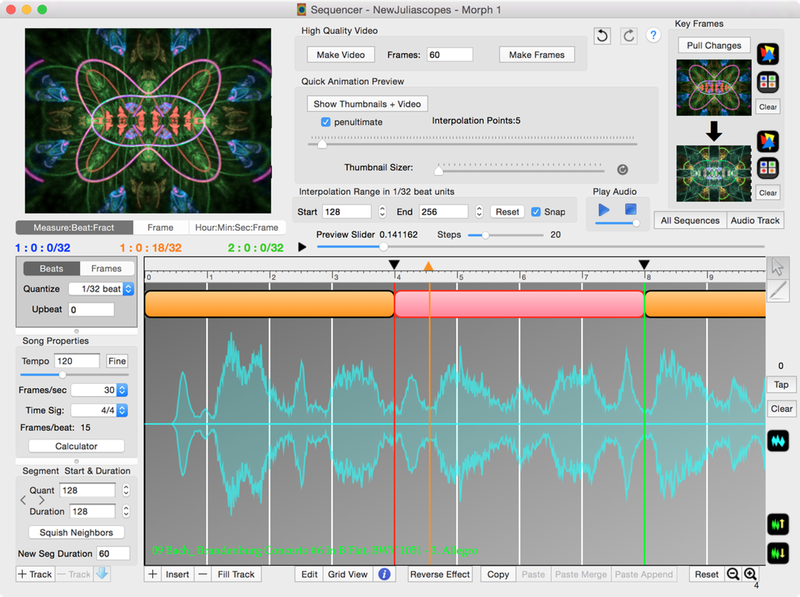
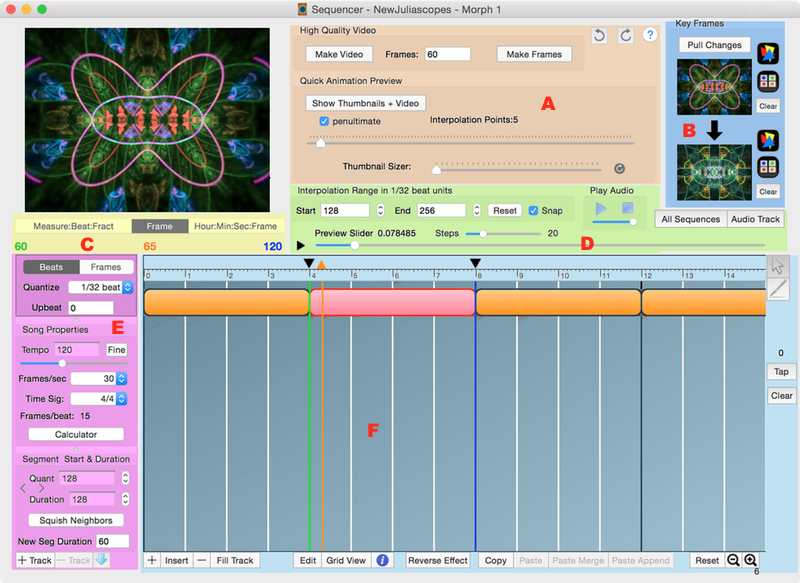
Animation Sequencer
You can optionally add an audio file to a sequence and show it relative to the animation sequence.
You will find that you need to preview segments of the entire animation sequence frequently to evaluate how portions of the final video appear.
These same controls allow you to render the final video.
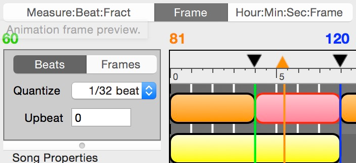
Preview Slider Animation
Preview Animation Slider
Moving this slider will cause a new fractal image to be rendered representing the current position of the slider. The slider uses the green and blue locator positions to set the time range of the animation. The slider’s position then is used to calculate the exact time of the preview fractal to be rendered.
Slider Position Text Field
The text field shows the current slider position. 0 corresponds to the far left slider endpoint and 1 corresponds to the far right endpoint.
Preview Play/Pause Button
Pressing the Play button will start rendering the preview fractal in steps from the current slider position.
Steps Slider
Sets the number of preview frames that will be rendered when pressing the Play button.
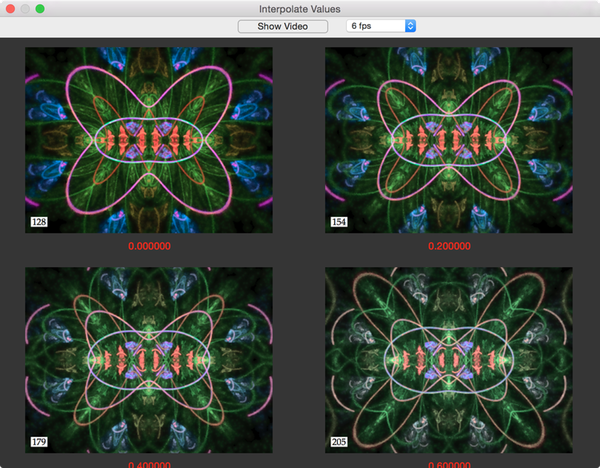
Thumbnail Animation Preview
Set the Sequencer’s locator positions to define the portion of the animation to be rendered, then do a trial rendering at small images sizes to see whether the animation looks good or not. The locators set the start and end of the trial rendering animation range.
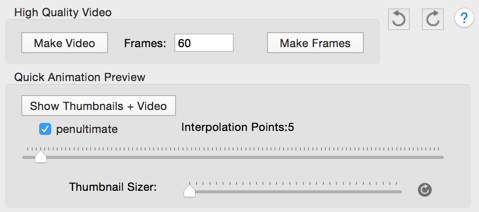
Show Thumbnails + Video
Open a thumbnail grid window with each thumbnail being an interpolated animation.
Penultimate
Checkbox for whether to adjust the video frames rendering to not render the last video frame.
The idea is to not have a repeated video frame for animations that cycle like Transform looping.
Number of interpolation points to show in the preview.
Thumbnail Sizer Slider
Determines the interpolated thumbnail size.
Re-Render Thumbnails Button
Re-renders the thumbnails.
Tap Tempo Display
Shows the Tap Tempo frequency.
Thumbnail Grid Window
The thumbnail grid window is displayed when you press the Show Thumbnails + Video button.
Note that each thumbnail’s frame or quantized unit position is shown.
Thumbnail Grid Window
After the thumbnails are rendered, you can click the Show Video button to display a preview video made from the thumbnails.
Show Video
Creates a preview video from the interpolated thumbnails in the thumbnail grid window.
Preview Video Frame Rate
The frame rate for the interpolated thumbnail video.
*Undo/Redo *
Undo
Undo the last sequencer edit.
Redo
Redo the last undone sequencer edit.
High Quality Video Frames and/or Video
Warning: Directly creating a video for the final sequencer rendering is NOT recommended as you will lose all the
rendering effort, if something goes wrong in the middle of a huge render of thousands of video frames. Rendering to Individual Files for each Video frame is much safer and also lets you peek at those files while the render is being done.
You have the choice of directly creating a video or saving the interpolated frames to a folder.
Make Video button
Opens the Direct Video Rendering panel to make Quicktime movie.
Make Frames button
Opens the Direct Video Rendering panel to render video frame image files into a folder.
Penultimate Video Frame Spacing
Here we show the animation amounts for 5 video frames with the penultimate setting being Off and On. The valid animation amount value range is between 0 and 1.
Penultimate
Frame 1
Frame 2
Frame 3
Frame 4
Frame 5
No
0.0
0.25
0.50
0.75
1.0
Yes
0.0
0.20
0.40
0.60
0.8
Cyclic animations repeat naturally such that without penultimate rendering the first and last video frames in an animation sequence would be identical. In the sequencer, if you had two adjacent cyclic animations, this would give you a repeated video frame - which looks like a short temporary pause in the animation.
An example cyclic animation is rotating a transform by 360 degrees.
Penultimate rendering adjusted the animation amount spacing to remove the repeated video frame. The number of video frames is the same, just the animation slider amount or “animation amount interval” between the video frames is adjusted.
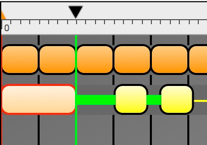
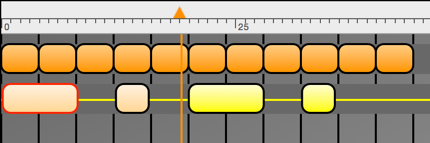
Current Segment’s Keyframes
Keyframes Region
The orange segments in the top row are Keyframe segments and will always have one or two associated keyframes. This region of the sequencer shows the current segment’s keyframes. The top keyframe is the from keyframe and the bottom keyframe is the to keyframe.
Yellow segments are Non-Keyframe segments and have no associated keyframes.
Changing the Selected Keyframe
You can modify the selected keyframe (select it by clicking on it with the mouse) by:
Dragging a fractal from elsewhere in the app and dropping it onto the keyframe.
Do Edit > Copy for a fractal elsewhere in the app and pasting it onto the keyframe.
Click the Clear button to remove a keyframe from the animation segment.
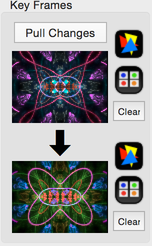
Click the Triangle Editor button, change the fractal with the Triangle Editor, close the Triangle Editor, then click the Pull Changes button. This allows you to modify the keyframe. Note: All instances of that keyframe will be changed. If you want to change just one instance, in the Keyframe Editor for the fractal, duplicate that keyframe and change the duplicate. Then copy that duplicate and paste it here.
Pull Changes
Update the keyframe thumbnails and the animation sequence for any changes you made to the keyframe elsewhere in the app.
Triangle Editor
Open the Triangle Editor for the fractal.
Open the Variants Editor
Open the Variants editor to play with different random combinations.
Clear
Remove the selected keyframe.
Keyframe Thumbnails Context Menu
View Fractal Info
Opens the Fractal Info window for this keyframe.
View Fractal’s Source Text
Open the XML source text for this keyframe.
Make Fractal Variants
Opens the Variants Editor for this keyframe.
Copy
Copies this keyframe to the clipboard.
Paste
Pastes over this keyframe with the keyframe on the clipboard.
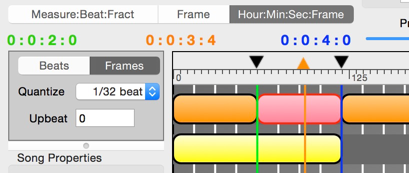
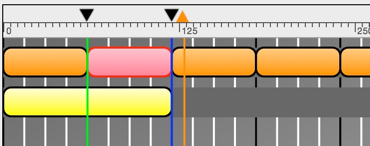
Locator Positions Display
The sequencer’s Locators define the time range for preview interpolation and making videos. The Preview Slider’s endpoints are defined by the locators’ time locations.
When editing you typically want a small interpolation region so that you can easily evaluate the animation by seeing an almost video frame by video frame preview.
When doing a final render, your interpolation range should be reset to the full time range of the sequence. (Click the reset button)
The left locator defines the start of the interpolation region.
The orange locator is the time location of the currently shown fractal preview image.
The right locator defines the end of the interpolation region.
The colors of the left and right locators can be either be blue or green. (If the right locator is blue, the left locator will be green. If the right locator is green, the left locator will be blue. )
When the audio waveform is shown, the playback locator (shown in red) shows the time location where the audio is playing at the moment (or where playback will start at if paused).
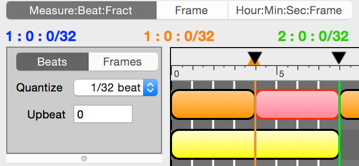
Measure:Beat:Fraction of BeatVideo FrameSMPTE Hour:Minute:Second:Video Frame
Moving Locators
The 2 ways to move a locator are:
Click and drag the triangular locator shown in the locator region of the ruler.
Edit the Start and/or End text fields to set the position of the locator(s). The units are in either frames or beat quantization units (depending on the Beats/Frames selection).
Removing a Locator
Click and drag the triangular locator shown in the locator region of the ruler to the far left. Only the blue and green locators can be removed.
Adding a Locator
If only one of the start/end locators is shown, click on the locator area of the ruler with the mouse to add the second locator. Alternatively you can edit the Start and/or End text fields to set the position of the locator(s).
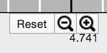
Timeline Ruler Units
Hour:Minute:Second:Frame
The sequencer timeline’s ruler units can be shown in either:
Beats
Music Beats (the default setting).
Frames
Video Frames.
For synching to music, beats aligns the segments to beats or quantized fractions of a beat (depending on the quantize setting). Each segment’s start and end durations is always aligned to a beat boundary so that the fractal animation durations are defined in terms of musical context.
Video frames are the alternate units for the timeline.
The actual unit format that Fractal Architect uses is Ticks units, which are defined as 3840 ticks per beat. Tick durations can be easily converted into quants without fractional clipping.
Fractal Architect is not a music sequencer and does not help you prepare your audio for use in your animations videos. However, it can take digital audio files prepared in other apps and incorporate it into your videos.
Select either Beats or Frames. In this example, Frames is selected.
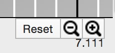
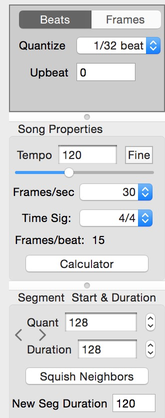
Timeline Zoom
In the bottom right corner of the sequencer is the Zoom controls for the sequencer window.
After clicking on the + magnification button, this is the result:
Reset Button
Reset the sequencer Zoom magnification to the default.
Zoom + Button
Zoom in
Zoom - Button
Zoom out
Zoom Magnification Text Field
This editable text field shows the current zoom level.
Interpolation Video Range & Preview Slider
Locator Range - Beat UnitsLocator Range - Video Frame Units
Interpolation Range
Start
Start of the interpolation frame range (in locator units).
End
End of the interpolation frame range (in locator units).
Reset
Resets the locators to cover the entire animation sequence (all of the segments).
Snap
Snap to Segment On/Off
Interpolation range is set to coincide with the currently selected segments range.
Audio
Play/Pause Audio Button
Begin playing a audio track assigned to the sequence or Pause the playback. Keyboard spacebar
Stop Audio Button
Sop playing a audio track assigned to the sequence or Pause the playback. When you Play the audio it will begin at the left locator.
Audio Player Rate Slider
Sets the audio playback speed.
Audio Track
Opens the Setup Audio Track window
Others
All Sequences
Open the Sequence Selector show you can edit or view a different animation sequence.
Preview Animation Slider
Moving this slider will cause a new fractal image to be rendered representing the current position of the slider. The slider uses the green and blue locator positions to set the time range of the animation. The slider’s position then is used to calculate the exact time of the preview fractal to be rendered.
Animation Amount Text Field
Above the slider and to the right of the Preview Animation Slider label is a text field. It shows the animation amount. This text field is fully editable and can be used to set the animation amount.
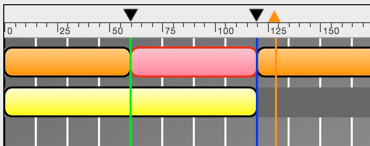
Song Properties
Song Properties
Each song can have a different tempo and time signature.
Beats / Frames Timeline Units Selector
Choose between beats and frames for the ruler’s units.
Quantize
For beats units, it is the whole fraction of a beat that segment durations must be quantized to.
Quants are measured as integral fractions of a beat. So if the quantization setting is 1/16 of a beat and there are 5 quants, this is the same time duration as 5/16 of a beat.
Upbeat
The number of beats before the first measure. In Fractal Architect, this determines where the first measure (black line) is drawing in the sequencer.
Some songs start with a weak upbeat followed by a strong beat marking the start of the first measure.
Song Properties
Tempo
Musical tempo in beats per minute.
Tempo Slider
Musical tempo slider.
Fine Button
Tempo Fine Control slider is shown that allows you to align visible beats in the audio waveform with the measure/beat lines drawn in the background of the sequencer.
Frames/sec
Video frame rate.
Time Signature
In sheet music, the time signature represents the number of beats per measure and the musical note type that represents a beat of music.
Most popular Western music is 4/4. Spanish and Latin American music is frequently 3/4 or 6/8.
Frames/Beat
Calculated video frames per beat. (not editable)
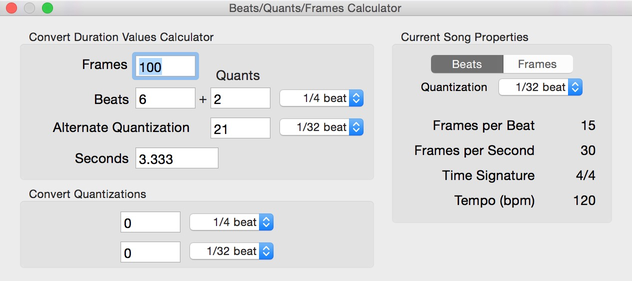
Calculator
Opens a handy calculator for converting between video frames, time in seconds, and beats+quants units.
Segment Start & Duration
Start Text Field & Steppers
Shows the selected segment’s start time in either quants or frames units.
Duration Text Field & Steppers
Shows the selected segment’s duration in either quants or frames units.
< Go to Segment on Left
Move the selection to the segment on the left.
> Go to Segment on Right
Move the selection to the segment on the right.
Squish Neighbors/Shove Neighbors Toggle Button
The top keyframe track can have no gaps. So as you resize a keyframe segment, do you want to affect its neighbors’ start/end time (shove mode) or its duration (squish mode).
New Segment Duration
Changes the default duration for newly added animation segments.
Frames/Beats/Quants Conversion Calculator
Sequence Editor
This calculator is a convenience tool for converting between Frames time units and Beats time units. In most cases, a time duration in Beats+Quants is NOT a whole multiple of video frames and vice versa. So this calculator shows the closest conversion.
Frames
Video frames.
Beats
Beats
Quants
Integral number of quants.
Quants are measured as integral fractions of a beat. So if the quantization setting is 1/16 of a beat and there are 5 quants, this is the same time duration as 5/16 of a beat.
Quantization Amount
Fractions of a beat. You can choose from several fractions between 1 beat and 1/32 beat.
Alternate Quantization
Change the alternate’s quantization setting and it will tell you the nearest number of quants that matches the video frames.
Convert Quantizations
Simple tool to convert quant values between different quantization levels.
Arranging Sequencer Tracks and Segments
The Sequencer display shows a timeline of tracks and segments.
A sequence is organized as a set of tracks. The first keyframe track is created for you automatically when you create a new sequence.
A track holds one to many animation segments.
A segment is a container for one to many simultaneous animations.
The ruler represents the animation timeline in either Beats or Video Frames units.
Segments are arranged into a timeline (determined by their position on the sequencer diagram.)
Video frames are created by first creating a fractal from the top keyframe track.
The current video frame is shown by the orange locator and is a vertical line.
Any segment in tracks below the top track adds animations only if the locator line intersects that segment.
Those segments add animations in a Top-to-Bottom order.
Clicking the + Track button to append a new track.
Use the Add New Track menu item on the context menu.
Remove a Track
You can remove a track by:
Clicking the - Track button to remove the selected track.
Use the Remove Selected Track menu item on the context menu.
Reordering Tracks
The top orange keyframe track cannot be moved down.
You can reorder the position of any non-keyframe track (yellow track) by
clicking on this button:
Select the track to be moved down in the track order and click on this button.
Add a New Segment
You can add a segment by:
Clicking the + button to append a new segment to the currently selected track.
Clicking the Insert button to insert a new segment before the currently selected segment.
Copy a segment by clicking the Copy button, then click Paste Append to paste append a new segment to the end of the track that is a copy of the copied segment.
Click on the Pencil Mode button to switch to pencil mode. Then draw a new segment on the currently selected track.
Use the Append New Segment or Insert New Segment menu items on the context menu.
The length of the new segment is determined by the value in the New Seg Duration text field.
Remove a Segment
You can remove a segment by:
Clicking the - button to remove the selected segment.
Use the Remove Segment menu item on the context menu.
Resizing & Moving Segments with Mouse
Click the segment you want to resize or move to select it first.
To resize it hover the mouse near either end of the segment till you see the resize cursor.
Then click and drag to resize the segment.
Resizing Segments
To move it hover the mouse near the center of the segment till you see the hand cursor.
Click and drag to move the segment.
Moving Segments
Swapping Segments With a Neighbor
Swapping segments allows you to have the selected segment swap places with its left or right neighbor segments.
Use Swap with Segment on Left to swap with its left neighbor.
Use Swap with Segment on Right to swap with its right neighbor.
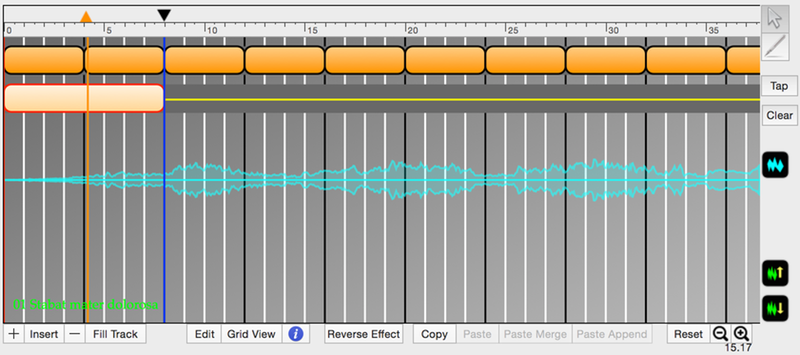
Sequencer Editing Area
Sequence Editor
The main sequencer editing area shows one or more animation tracks. Each track has one or more animation segments. The horizontal axis represents time (as shown in the ruler). The vertical axis represents separate animation tracks
The top track is the keyframe track and contains one or more keyframe animation segments. The segments are organized by time and are laid out in a single row (or track). Segments are not allowed to overlap one another. The keyframe track’s segments cannot have a gaps between them.
The optional bottom tracks are non-keyframe tracks and contain one or non-keyframe animation segments. The segments are organized by time and are laid out in a single row (or track). Segments are not allowed to overlap one another.
The non-keyframe tracks’ segments can have a gaps between them (unlike the keyframe track). Non-keyframe segments can overlap keyframe segments, which are on a different track.
Beat pulsing animations are best placed on its own non-keyframe track .
Sequencer Editing Related Buttons
Track Manipulation
+ Track
Add a new track.
- Track
Remove selected track.
Move the selected track down the list of tracks
Segment Manipulation
+
Append a new segment to end of track.
Insert
Add new segment before the selected segment.
-
Remove the selected segment.
Fill Track
Opens the Fill Track with New Segments window.
Edit
Opens the Animation Configurator for the selected segment so you can edit it.
Grid View
View the selected animation segment as a table.
Open/close the segment info popover.
Reverse Effect
Reverse the animation effects.
Copy/Paste Related
Copy
Copy the selected animation segment.
Paste
Paste the copied animation segment. Existing animations are removed.
Paste Merge
Merge animations from the copied animation segment. Existing animations are preserved.
Paste Append
Paste the copied animation segment as a new segment appended to right end of track.
Zoom Magnification
Reset Button
Reset the sequencer Zoom magnification to the default.
Zoom in sequencer magnification.
Zoom out sequencer magnification.
Zoom Magnification Text Field
This editable text field shows the current zoom level.
Editing Mode
Normal/Pencil Editing Mode
Set sequencer editing mode to either Normal or Pencil editing mode.
Pencil mode shows a pencil cursor that allows you to draw in new animation segments.
Setting Tap Tempo
Tap
Click the button in time with the beat while audio is being played to set the tap tempo.
Clear
Clear the tap tempo.
Audio Waveform
Show/Hide the audio waveform., if any
Expand Waveform vertically.
Shrink Waveform vertically.
Sequencer Menu
—
When you have a Sequence Editor window open, this menu will be available.
Open Sequence Selector
Open Sequence Selector window to work on another sequence.
Add New Loop/Morph Sequence
Create a new Loop/Morph Sequence and open another Sequence Editor window for it.
Save as Sequence Template
Save this sequence as a sequence template file that can be used as a template for new sequences.
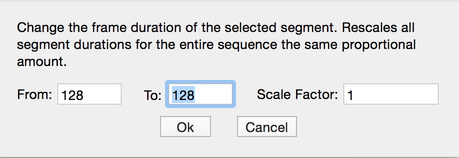
Scale All Segment Durations
Globally change the duration of all animation segments, for this sequence, by a scale factor.
Audio Related
Setup Audio Track
Open the Setup Audio Track window.
Show Audio File in Finder
Shows the current audio track’s file in the Finder.
Show/Hide Audio Waveform
Shows/hides the audio waveform, if any.
Copy/Paste Animation Segments
Copy Segment
Copy the selected animation segment.
Paste Segment
Paste the copied animation segment. Existing animations are removed.
Paste Merge Segment
Merge animations from the copied animation segment. Existing animations are preserved.
Sequencer Editor Context Menu
—
Animation Segment Related
Edit Animation Segment…
Opens the Animation Configurator for the selected segment so you can edit it.
Grid View of Animations…
View the selected animation segment as a table.
Segment Info
Open/close the segment info popover.
Reverse Animation Effect
Reverse the animation effects by mirroring the animations.
Unbundle Keyframe Morph Animation
Convert a morph animation segment to a single keyframe animation segment that is the equivalent of the original morph animation.
Copy/Paste Animation Segments
Copy Segment
Copy the selected animation segment.
Paste Segment
Paste the copied animation segment. Existing animations are removed.
Paste Append New Segment
Paste the copied animation segment as a new segment appended to right end of track.
Paste Merge Segment
Merge animations from the copied animation segment. Existing animations are preserved.
More Animation Segment Related
Append New Segment
Append a new segment to end of track.
Insert New Segment
Add new segment before the selected segment.
Remove Segment
Remove the selected segment.
Fill Track with this Segment…
Opens the Fill Track with New Segments window.
Swap with Segment on Left
Swap places with the segment to my left.
Swap with Segment on Right
Swap places with the segment to my right.
Struts
Struts connecting 3 segments
Struts are rigid placeholders between two segments. They effectively create a connected group of segments that are moved together. You can grab the current selected segment with the mouse and drag it right or left. All of the connected segments and the struts between them will be moved.
Struts are only placed where there is a gap between two segments. You can create a strut by clicking with the mouse between two segments. You can remove that same strut by clicking it a second time with the mouse.
If the interval between the start of the segments in the group are the correct distance from each other, moving the group, whose segments are connected by Struts is much easier than moving each segment individually.
Struts have no affect on animation rendering.
Struts > Connect All Struts in this Track
Add struts wherever there is a gap between two segments on this track.
Struts > Connect All Struts to Left
Add struts wherever there is a gap between two segments to the left of the selected segment.
Struts > Connect All Struts to Right
Add struts wherever there is a gap between two segments to the right of the selected segment.
Struts > Connect All Struts in Selection
Add struts wherever there is a gap between two segments that are in the group of selected segments.
Struts > Break All Struts in this Track
Remove all struts that are on this track.
Struts > Break All Struts to Left
Remove all struts to the left of the selected segment which are on this track.
Struts > Break All Struts to Right
Remove all struts to the right of the selected segment which are on this track.
Segment Durations
Scale All Segment Durations
Globally change the duration of all animation segments, for this sequence, by a scale factor.
Scale This Track’s Segment Durations
Change the duration of all animation segments on just the selected animation track by a scale factor.
Scaling all Segment Durations
Track Related
Add New Track
Add a new track.
Remove Selected Track
Remove selected track.
Select All Segments on Track
Select all segments on the selected track.
Audio Related
Setup Audio Track
Open the Setup Audio Track window.
Show Audio File in Finder
Shows the current audio track’s file in the Finder.
Show/Hide Audio Waveform
Shows/hides the audio waveform, if any.
Zoom Magnification
You can change the Horizontal Scale to enlarge/shrink the size of the animation segments (without affecting their durations). For instance, you can zoom out of a 5 minute long animation sequence with 100’s of animation segments and see the entire animation at once (the audio waveform, if any, is scaled horizontally as well). You can zoom in to a particular video frame range.
A two finger pinch trackpad gesture will change the Horizontal scale factor.
Expand Horizontal Scale
Zoom into the sequencer editor.
Shrink Horizontal Scale
Zoom out of the sequencer editor.
Reset Horizontal Scale
Reset Zoom magnification to the default.
Audio Waveform
The audio waveform can be hidden to improve the redraw speed of the sequencer.
You can also expand or shrink the height of the waveform by using the buttons shown below. You can use a vertical two finger swipe on the trackpad to enlarge/shrink the waveform.
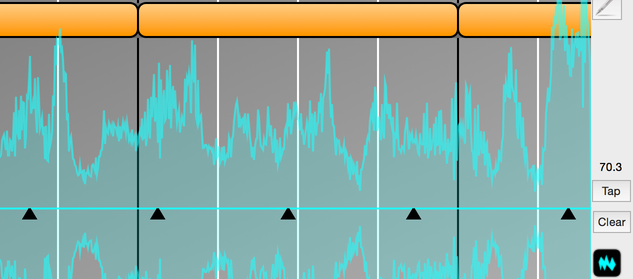
You might want to do this to align a segment with a drum beat waveform. By plotting the Beat Pulse animation’s peak with the drum beat waveform, you can be sure the video will animate in synch with the drum beat.
Show/Hide the audio waveform., if any
Expand Waveform vertically.
Shrink Waveform vertically.
Tap Tempo
Figuring out the actual tempo for a song is difficult.
The Sequencer allows you to determine the tempo by tapping on the Tap button, with the mouse, while listening to the music audio. You want to press button every time you hear a beat of music. You might want to tap the button about 8 to 10 times to get a more accurate tap tempo.
If you mess up (like forget to tap the button on a beat), just click the Clear tempo to reset the Tap Tempo history and start tapping again.
As you tap the button, the actual spot of each tap is shown in the sequencer. As you can see, tapping precisely on the beat is hard to do. So you should tap many times so that the tap timing error is averaged out. (The interval between two specific taps is not very precise, but as you record more taps the average interval of all the intervals is accurate).
Tap Tempo - Mouse Taps
The sequencer displays the average Tap Tempo above the Tap button.
Next, you set the Sequence’s Tempo by typing the Tap Tempo value into the Tempo text field. If the audio waveform visibly shows the beat of the music, you can adjust the Tempo further with the Tempo slider and Tempo Fine Control sliders.
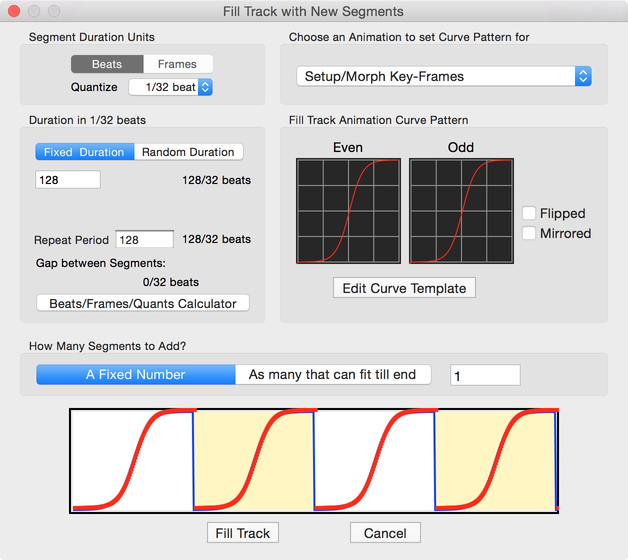
Fill Track With New Segments Window
This window allows you to treat the currently selected segment as a template and make one or more new segments that are copies of that template. Those new segments are added to the end of the currently selected track.
For each animation, you can choose to have the animation curves for the odd segments be a flipped or mirrored curve from the even segments. This behavior is settable at the individual animation level, so that different animations can have different animation curve behavior.
Fill Track WindowFill Track Window Mirrored Even/Odd Curves
Segment Duration Units
Beats/Frames Selector
Choose the new segment durations; units to be in either video frames or quantized beat slices.
Quantize
Determines the beat quantization amount.
Choose an Animation to Set Curve Pattern for
Animation Selector
Select an animation to see its animation curve and allow you to optionally choose flipped/mirrored for odd animation segments.
Duration in ?? Units
Fixed Duration / Random Duration Selector
If fixed, all new segments will be the same duration. If random, the new segments will have random duration between the min duration and max duration.
Duration
The duration of the new segments.
Repeat Period
The interval between the start of 2 consecutive segments. You can make this larger than the duration setting, so the new animation segments will have gaps between them.
Beats/Frames/Quants Calculator
Calculator for converting between different beat quantize amounts and video frames.
Fill Track Animation Curve Pattern
Even
Shows the animation curve for even numbered segments.
Odd
Shows the animation curve for odd numbered segments.
Flipped
When checked, this will flip the animation curve for odd numbered segments.
Mirrored
When checked, this will mirror the animation curve for odd numbered segments.
Edit Curve Template
Opens the Animation configurator for the selected animation segment so you can change is animation curve for the selected animation.
How Many Segments to Add?
You can choose to add a fixed number of segments or choose to fill the track until you have enough segments to extend up to the keyframe track’s far right segment.
Animation Curve Plot
This graphic curve plot shows the animation curve pattern, for the selected animation.
Segment Selections
Segment selections can be either a single segment or a multiple segment selection, comprised of a primary selected segment + one or more ancillary segments on the same track as the primary segment. Multiple segment selections cannot span multiple tracks.
The primary selected segment is bordered in red.
Segment selection affects:
Copy/Paste
Option Dragging
Dragging several segments (while pressing the Option key) and dropping them elsewhere creates a copy of the segments.
Moving/Resizing Segments
Selecting Segments
Click on a segment to select it.
Click on a segment while holding the ⌘ key toggles an ancillary segment’s selected state. The primary selected segment’s selection state cannot be toggled.
Click on a segment while holding the Shift key extends the selection. All segments between the primary selected segment and the mouse click location will be selected.
Rubber band Selection.
Click outside of any segment and drag the mouse to create a rectangular selection region to select one or more segments.
Double clicking on a segment selects it and opens the Animation Configurator window for that segment.
Use the keyboard arrow keys to select a different segment.
Selecting a Track
Clicking on a segment selects it and selects the track.
Clicking on a track outside of all segments, clears the current segment selection and selects the track.
Copy/Paste
To copy the selected animation segment to the clipboard:
Click the Copy button.
Use the Edit > Copy menu item.
Paste
To paste the copied animation segment from the clipboard onto one or more other segments:
Click the Paste button.
Use the Edit > Paste menu item.
A normal Paste operation overwrites the destination segment with the contents of the copied segment on the clipboard. Only the destination segment’ location and length are preserved.
Paste Onto Multiple Segments
You can paste onto multiple selected segments with a single Paste operation. If you select multiple segments, then do a Paste, the paste will be done to each of the selected segments.
Paste Merge
A Paste Merge operation does not overwrite the destination animation segment, but merges the contents of the copied segment from the clipboard onto the destination segment.
Paste Append
A Paste Append operation appends a new animation segment that is the same as the copied segment on the clipboard. The length of the new segment is determined by the value in the New Seg Duration text field.
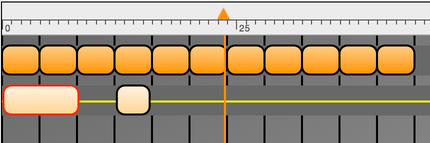
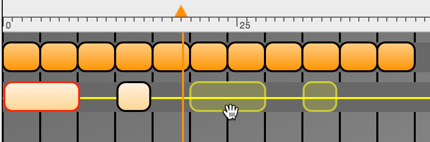
Option Dragging with Mouse to Copy Segments
Dragging several segments (while pressing the Option key) and dropping them elsewhere creates a copy of the segments. This is an easy way to copy multiple segments at a time.
Only the primary segment in a multiple selection can be dragged. You must hold the Option key when starting the click-drag, otherwise the segment will just be moved.
Initial StateDraggingAfter Drop
Opening the Configurator for a Segment
There are 4 different ways to open a segment’s animation configuration window.
Double click on a segment.
Select a segment then click the return key.
Click on the Edit button.
Use the context menu’s Edit Animation segment menu item.
Opening the Segment Info Popover
To open(or close) the info window:
Click on the Info button.
Press the ⌘I key combination (Pressing this a second time closes the popover).
Use the context menu’s Segment Info menu item.
To close the info popover, click outside the popover window.
Use the arrow keys to change the segment the info window displays information for.
When the info button is open, clicking on a different segment changes the segment the info window displays information for. (Sometimes this will close the info popover.)
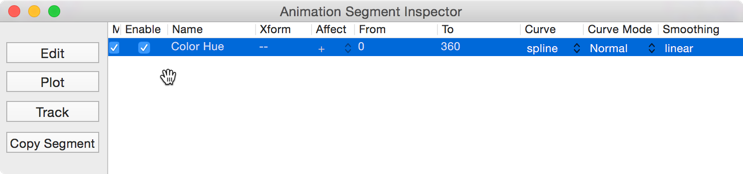
Animation Info Popover
This popover shows all of the configured animations for the selected segment. The animation curve for the currently selected animation is also shown.
Select other animations in the animation table to see their animation curve.
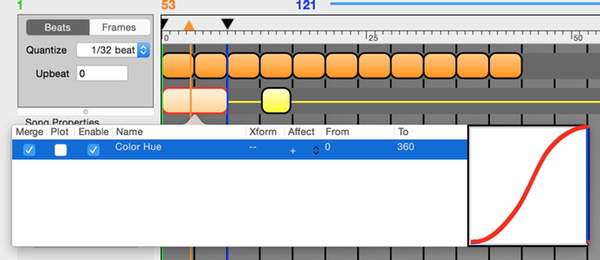
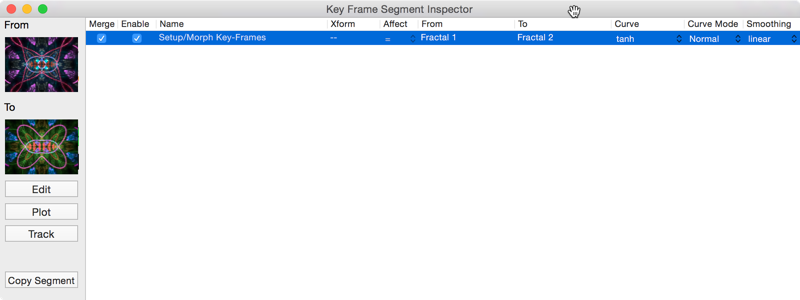
Segment Info Popover
Merge
Toggles whether this animation can be overwritten by a Paste Merge operation. (editable)
Plot
Toggles drawing the animation’s curve on top of the animation segment.(editable)
Enable
Toggles enabling/disabling the animation. Disabled animations are ignored when creating the animated previews/videos.(editable)
Name
The animation’s name.
Xform
The transform that the animation will be applied to.
Affect
The animation’s affect mode.(editable)
From
The from animation value.(editable)
To
The to animation value.(editable)
Curve Plot
The animation’s curve.
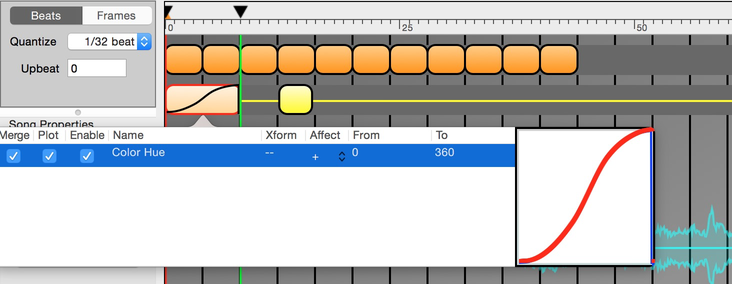
Plotting Animation Curve Atop Segment
The Info Popover’s Plot setting turns on the animation curve plot for the selected animation. The animation curve is plotted on top of the segment. The highest point in the curve is shown by a vertical black line.
Limitations:
Only one animation curve can be plotted at a time.
Only the selected segment’s curve is plotted.
Plotting the curve is not a global setting. Changing the selected segment will turn off the plot, unless the newly selected segment has Plot enabled for an animation curve it contains.
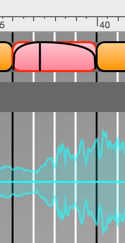
Segment Curve Plot On
You can use this feature to show the relationship between the audio waveform and the video animation. For instance, with Beat Pulsing animations you can make sure the video animation coincides with the beat. If not, you will need to nudge the animation segment.
Segment Curve Plot + Waveform
Grid View + Track View
Clicking on the Grid View button opens the Table view of the animation segment.
Keyframe segment Grid Views display the keyframes.
Edit
Open the Animation configurator window for this segment.
Plot
Open a Curve Plot window showing the selected animation’s animation curve.
Track
Open the Track Grid view for the selected animation. This shows all the instances of that animation on the selected Track.
Copy Segment
Copy the animation segment to the clipboard.
Grid View of Keyframe SegmentGrid View of Non-Keyframe Segemnt
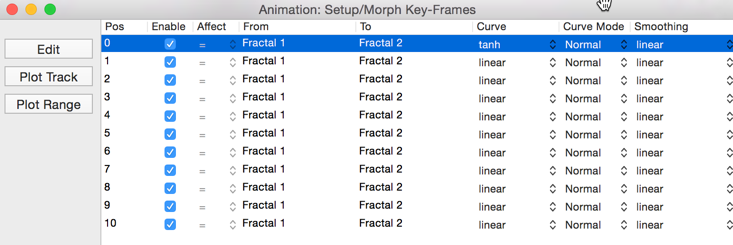
Track Grid View
The Grid View’s Track button opens the Track Grid View window for the selected animation. It shows all instances of that animation on the selected track.
Edit
Open the Animation configurator window for this segment.
Plot Track
Open a Curve Plot window showing the all of the animation curves on this track for the selected animation.
Plot Range
Open a Curve Plot window showing the all of the animation curves on this track for the selected animation. Only animation segments inside the current Sequencer Locator range are plotted.
 Open the Sequencer Selector Button
: This opens the Select a Sequence dialog.
Open the Sequencer Selector Button
: This opens the Select a Sequence dialog.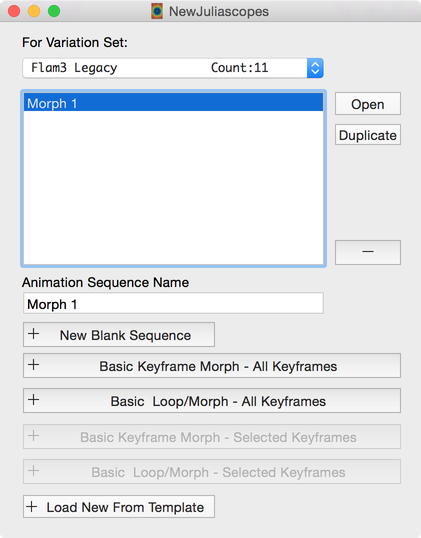


 Triangle Editor
 Open the Variants Editor