Fractal Architect 5 Help Index
Fractal Animation Concepts
Applies to:FA 5
See also: Animation Sequencer
See also: Cross Breeder - Fractal Morphing
Property Animation
A single property animation is:
- a property to be changed
- a from value
- a to value
- a duration whose units are number of video frames
- an animation curve
Fractal Architect 3D supported animating just a single property at a time (from the Triangle Editor’s QuickSpin windows).
Animation Segments
An Animation Segment is a group containing one or more animations that will be animated together (changed over time).
- The start and end video frame of the animations are shared by each animation. The individual animations start at the same video frame and end at the same video frame.
- The animated properties are changed in parallel.
- Each animation property in the segment can have a different animation curve. The types of animation curves available is dependent on the type of animation.
- There can be many separation animations in an animation segment. Potentially hundreds.
- An animation segment has a target fractal, which can be either the morphed combination from a pair of keyframes OR a single keyframe itself. The animation segment is bound to its target fractal at the point of rendering the animation.
So in summary, an Animation Segment represents multiple simultaneous property animations, that are applied to each video frame.
Where Are Animation Segments Used?
In the app, both the Triangle Editor and Cross-Breeder, now let you create a single Animation Segment by clicking on the Custom Animations button.
This allows you to animate multiple properties at the same time.
The Super Variants Editor uses a single Animation segment to specify the property max/min value ranges for a number of properties. It then creates new fractals by selecting values inside the max/min value range for each property.
The Animation Sequencer lets you place Animation Segments on a timeline in one or more Animation Tracks. Every segment in the Sequencer is an Animation Segment.
Keyframe Segments vs Non-Keyframe Segments
Animation segments can be classified as either Keyframe segments or Non-Keyframe Segments.
A Non-Keyframe segment does not reference a specific keyframe (as part of its definition). The app binds that segment to a specific keyframe at the time of rendering the animation. So in a sense this make them reusable with different keyframes.
A Keyframe segment always includes a morph animation referencing either one or two specific keyframes. It also lets you specify the same properties as a Non-Keyframe segment. Keyframe segments refer to a specific keyframes as part of its animation.
Keyframe Delta Segments
Fractal Architect 5 introduces the very powerful ability to capture the differences between 2 fractal keyframes as a Keyframe Delta Segment.
These animation segments contains a bundle of animations that captures the entire delta between 2 keyframes. Unlike morphing 2 keyframes, these Keyframe Delta Segments expose all of the keyframe differences as individual property animations.
When used for animation coupled together with the first keyframe, setting an animation amount of zero, creates a fractal that is identical to the first keyframe. For an animation amount of 1.0, that creates a fractal this is identical to the second keyframe.
Variants Editor Creates Keyframe Delta Segments
The Variants editor combined with Lua Tweak scripts can create some new wild fractals from an initial fractal (think of this initial fractal as the keyframe 1). Think of the variant fractal as keyframe 2.
So with the Variants editor, select one of the variant thumbnails, then click the Copy Animations button. This creates a Keyframe Delta Segment and copies it to the pasteboard. The initial fractal is copied to the pasteboard as well.
You can then paste that onto one of the keyframe animation segments in the Sequencer. The whole idea here is to make it trivial to create exciting animation sequences by using the Variants editor.
Super Variants Exploit Keyframe Delta Segments
The Super Variants editor is a consumer of these special segments and the initial keyframe.
From the Variants editor, you can select a variant thumbnail, then click the Super Variants icon button. This opens a new Super Variants window, configured with the Keyframe Delta Segment and the initial fractal from the Variants editor.
Now you apply different animation curves to each property animation in the segment.
Click Roll Dice, which applies random animation amounts, to get a new set of random fractals.
Animation Segment Configurator
This is an Animation Segment Configurator view for a pair of morphed keyframes with a couple of other animations included.
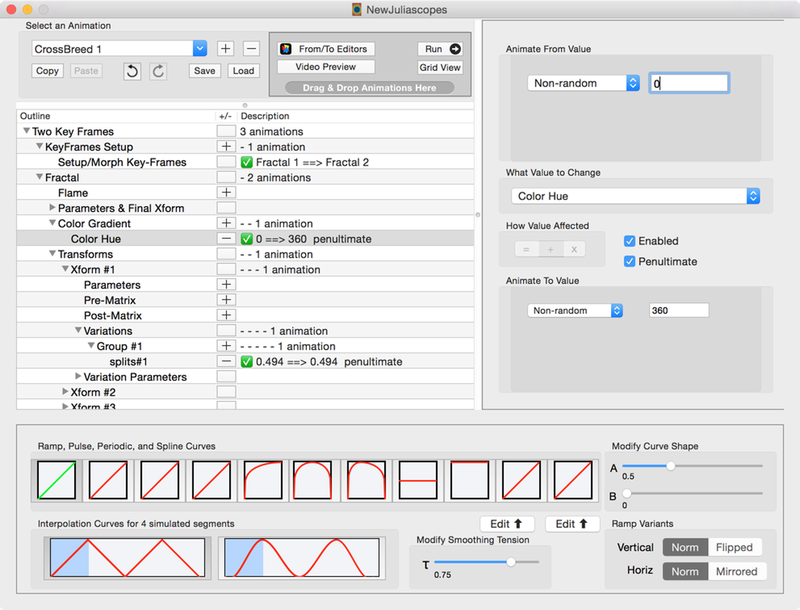
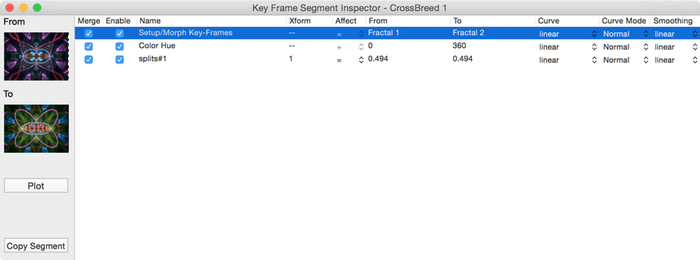
There is a simplified Grid View that lets you see the Animation segment’s animations.
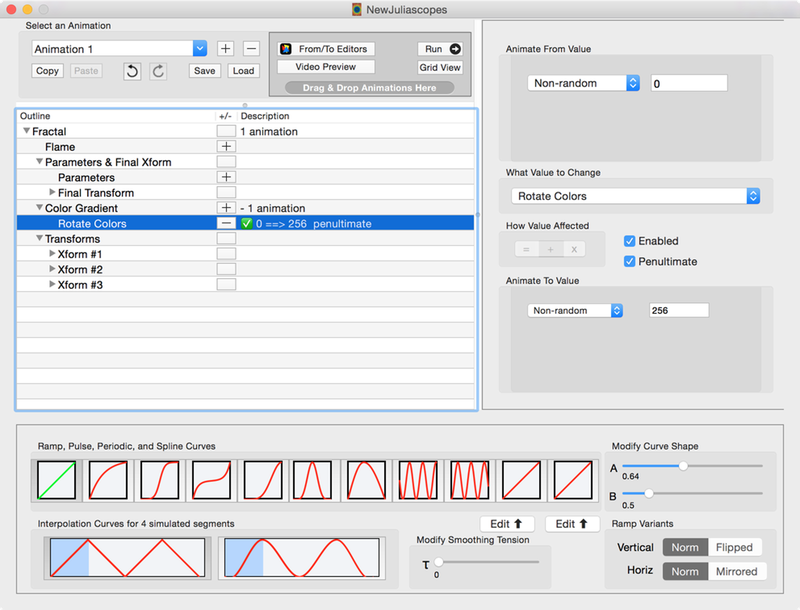
This is a Animation Segment Configurator view applied to a single keyframe (not shown). In this example the animation shown will rotate the color gradient’s color stops.
Animation Curves
Animation curves allow you to change the actual amount of animation as you drag the animation slider with the mouse.
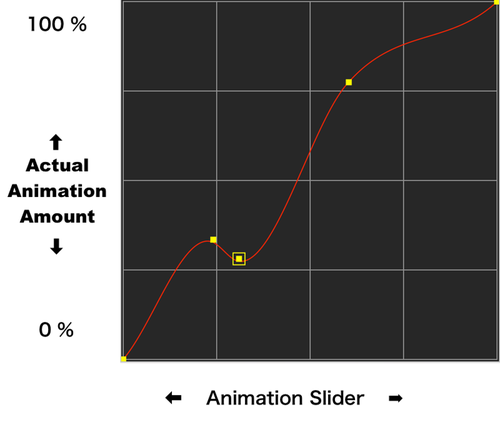
Animation Curve Plot
The vertical axis of Animation curve is the Actual animation amount. The horizontal axis is the input animation amount from the slider.
So to use this plot graph, start with the Slider’s relative position on the bottom of the graph.
Look up above that spot and see where a vertical line intersects the red curve.
The position of the intersection point on the red curve tells you the actual animation amount.
Linear Curve

With a linear animation curve,
parameter value = From Value + (To Value - From Value) X animationAmount
So if you have a duration of 10 frames and you are rendering the 3rd frame, the animationAmount is 0.3. For the 4th frame, it will be 0.4.
These graphs show how far the animation has progressed versus time (or video frames).
The X axis is time (or video frames). The left side represents time 0 and the right side represents the full duration of animation.
The Y axis of these graphs is the animation amount. The bottom represents an animation Amount of 0 (or 0%). The top line represents an animation amount of 1 (or 100%).
Ease-in Ease-out curve

If you mirror the animation curve, the animation will be rendered in reverse, starting at 100% and ending at 0%.
If you flip the animation curve, the animation curve is flipped upside down.
Using Triangle Editor to Edit an Animation Segment
You can create animations by differencing two fractals and use that difference to create an animation segment from.
The first fractal represents a 0% animation amount. The second fractal represents a 100% animation amount.
So you can use the Triangle Editor to modify two fractals. Once you have created two different fractals, the Animation Configurator can create a Difference animation segment. At 0% animation amount, you will get the first fractal. At 100% animation amount, you will get the second fractal.
Many of you will find this an easy and intuitive approach to creating animations.
From/To Editors Button
The Animation segment configurator has a From/To Editors button that shows all keyframes and the From / To endpoint thumbnails.
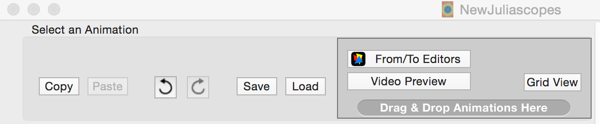
You can edit the From / To Endpoints with Triangle/Color Gradient editor to setup the animation segment endpoints
The Animation Configurator has 4 fractal thumbnails that you can modify
Keyframe 1
From Endpoint
To Endpoint
Keyframe 2

To define an animation segment, you would open 2 Triangle editor windows, one for the the From Endpoint and one for the To Endpoint.
When you CLOSE both editors, the differences between the two fractals will be used by the Animation configurator to create the equivalent Animation segment.
For Morph Animation Segment
These charts shows how the From (0% animation) fractal is related to the first keyframe and how the To (100% animation) fractal thumbnail is related to the second keyframe.
Don’t confuse the From and To endpoints with the keyframes. They are derived from them as shown below:
From Endpoint = Keyframe 1 + AnimationSegment @ 0%
From animation properties = AnimationSegment @ 0%
From animation properties <== FromFlame - Keyframe1
To Endpoint = Keyframe 2 + AnimationSegment @ 100%
To animation properties = AnimationSegment @ 100%
To animation properties <== ToFlame - Keyframe2
For Single Keyframe Animation Segment
For Single keyframes animations segments, there is only one keyframe, not two.
From Endpoint = Keyframe 1 + AnimationSegment @ 0%
From animation properties = AnimationSegment @ 0%
From animation properties <== FromFlame - Keyframe1
To Endpoint = Keyframe 1 + AnimationSegment @ 100%
To animation properties = AnimationSegment @ 100%
To animation properties <== ToFlame - FromFlame
So the essence of this if you have two fractals, you can get an Animation segment, that when its applied to the first fractal will give you the second fractal.
So given the input keyframes, two more fractals representing the From state and To state are needed. (It is common that the From fractal is the same as the first keyframe [but that is not required]).
The vertical axis of Animation curve is the From/To values. The horizontal axis is the animationAmount.
The triangle editors allow you to modify the From fractals and To fractals. The initial state (before editing) for the From fractal is the first keyframe.
The initial state (before editing) for the To fractal is the second keyframe (if there is one) or the first keyframe if not.
Animation Sequencer
This is not very flexible - requiring all animations to start and stop together in an animation segment.
Fractal Architect 5 introduces the world’s first Fractal Animation Sequencer.
It allows you to place multiple animation segments in a timeline. This first highlighted animation segment here is a Morph segment, with its keyframes shown.
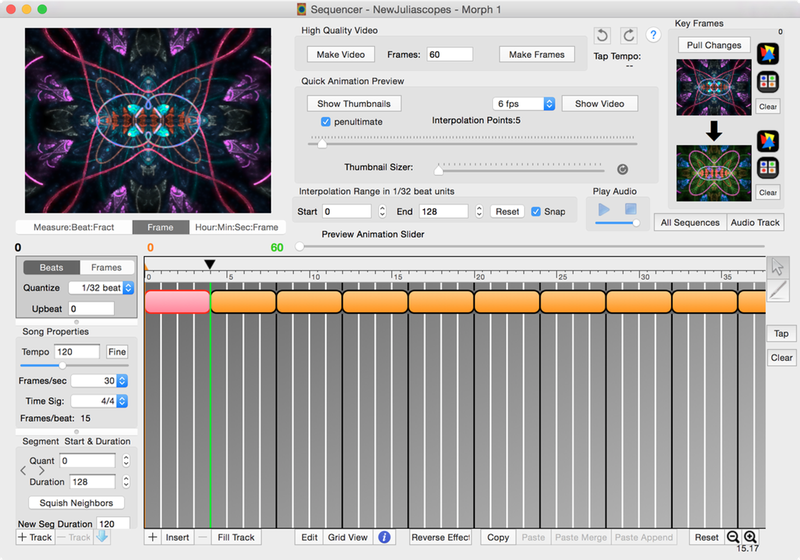
So we add the concept of a Animation Sequencer with multiple Animation Tracks. The top one is always a Keyframe track, the others are non-keyframe tracks.
- No animation segments can overlap each other on a single track. Segments on track A can overlap segments on track B. So if you need to overlap animations, add another track.
- Keyframe track segments cannot have gaps between the segments. Non-keyframe tracks can have gaps.
How it works - Flows down from the top track to bottom track at each video Frame
At each video frame, the animation engine locates the correct keyframe animation segment, determines the animation amount inside that segment, then creates a temporary fractal from the keyframe morph (if any).
It will also apply any other parameter value interpolations for any other animations set by you in that top keyframe segment.
Next, it goes down to the next animation segment (if one exists). It takes the temporary fractal, then applies any parameter value interpolations (in that animation segment) on that temporary fractal.
Note if the lower animation segment has the same parameter as a segment above it, the lower segment’s parameter value will override the upper segment’s value.
When it reaches the bottom track, it then renders that temporary fractal for the sequencer preview window (or it creates an output video frame).
Sequencer Ruler and Locators
The ruler area shows either video frame or beats (think music beats and measures).
The numbers below the fractal image preview shows the time locations of the left (black), current (orange), right (green) locators in the sequencer area. The idea is the same as the Locators on Logic Pro’s sequencer.
The left and right locators determine the interpolation range for the Animation Amount slider at the top of the window. You set their locations close together to limit the range of interpolation to a small video frame range.
You set them far apart so the range of interpolation covers a large video frame range.
They have no affect on the animation definition, just the animation range of the interpolated preview fractal.
If you slide the Animation amount slider, it will determine the video frame to be shown in the Preview. (It will also move the orange locator so you can see which video frame is being shown.)
You can also drag the orange locator, but the preview will not be updated till you release the mouse button at the end of the drag. (The ruler locators don’t support continuous updates.)
Song Properties
You specify tempo, time signature, and video frame rate.
The sequencer shows a black vertical line at the start of each measure. The sequencer shows a white vertical line at the start of each beat. That way you can figure out which video frame happens relative to some moment in time in your song.
Copying and Pasting Animation Segments
Copying from a keyframe segment to a non-keyframe segment does not copy the keyframe animation but everything else is copied.
Copying from a non-keyframe animation to a keyframe animation copies everything but leaves the keyframe animation unchanged.
There are two types of animation segments, orange keyframe and yellow non-keyframe. Only keyframe segments allow keyframe morph animations. So:
- Triangle editor custom animations creates non-keyframe animation segments.
- Cross-breeder custom animations creates keyframe animation segments.
You can drag a fractal from a Variants editor thumbnail onto a sequencer segment, or onto the Animation segment configurator’s Drag & Drop animations here area.
Variants thumbnail drags copy a hidden non-keyframe animation segment in them which is copied when you drop them.
You can copy and paste animation segments in the main sequencer area.
The animation configurator windows have copy/paste buttons at the top too.
Drag and Drop Onto Sequencer
You can drag and drop keyframes from other fractal files onto the keyframe thumbnails in the Sequencer. You will see in the Preview Keyframes window, that those new keyframes are automatically added as normal keyframes too.
One restriction on morphing is that both keyframes have to use the same Variation set. (That is why the normal Keyframes window has the Split by Variation Set button)
You can have keyframes using different Variation sets in the Sequencer, but not in the same Keyframe animation segment. Of course there will not be a smooth transition from one keyframe segment to the next (in that case).
Keyframes
The keyframes for the animation will always be saved as ordinary keyframes that you can see in the Keyframes window (using the Frames button on a Preview window).
There is no keyframe ordering issue (like you have with the animation panel on the Keyframes window). The Sequencer just stores a reference to the keyframes in each keyframe animation segment.
You can rearrange keyframe animation segments any way you like in the Sequencer (or just use a subset of keyframes there too). You can use the same keyframe multiple times too.
You can create multiple Sequences that use the same keyframes and that is fine. Each fractal file can hold multiple Sequence definitions, each which is independent of the others.
The Triangle editor button on the Sequencer just opens the triangle editor in exactly the same way as you would from the Preview window’s, Keyframes panel. It is a convenience.
The Pull Changes button will refresh the Sequencer thumbnails and preview thumbnail for any changes you made to the keyframe with the Triangle editor. Closing the Triangle editor will push any changes to the other windows automatically.
But if you leave it open, no push of the changes is done. So if you are going back and forth between the Triangle Editor and the Sequencer, you should use the Pull Changes button on the Sequencer to pull the latest keyframes over.
Since the Sequence only stores references to the keyframes, you will always get the latest keyframes state when you reopen the Sequence later. When rendering to a movie, the engine will use the latest keyframe state too.
Its only the Sequencer thumbnail previews that need to be updated.
Layered Animations from Multiple Animation Tracks
As each video frame of the animation is created, the engine creates a fractal from the keyframe(s) on the orange keyframe track. That fractal is then passed down to the next track where other animations are then applied to the fractal.
You can create yellow non-keyframe animation segments, that overlap 2 or more orange keyframe segments. Or they can coincide with just 1 orange keyframe segment (or just a part of that keyframe segment).
How Multiple Animation Tracks are Used
The animation engine creates an animation like this:
For every video frame:
First figure out, starting from the top track (which holds the keyframes information), which animation segment is the current one:
Calculate a new output fractal for that video frame (but don’t render it quite yet)
Next for each animation track in turn:
Go down to the next track and figure out which animation segment is now the current one (if any).
Apply the animation to the output fractal from the track above and create a new output fractal.
If at the bottom track, then send the output fractal for rendering
What this gives you:
- You can have an animation track that will be used for just adding pulse animations that corresponds to musical beats. That way the music animation is not intermixed with the keyframes.
- The animation segments on different tracks can be different lengths (duration or video frame count).
Struts
Struts can be set between 2 segments to lock the distance between them - they are shown as a thick bar between two segments.
Clicking on gap between two segments with the mouse will toggle the strut on/off.
Struts create an group of segments that are moved as a group.
Changes to segment’s offset and duration affect adjacent segments if they are connected with a strut (changed by either mouse dragging or by entering the values in the text edit fields)
New menu commands for creating structs between all segments on a track, creating struts in all gaps that are to the left of the selected segment, and creating struts in all gaps that are to the right.
Struts are not persistent and are not saved.
Working With the Sequencer
Hover the mouse over the right end of the segment and you will see the segment resize mouse icon. Then just drag with the mouse to resize the segment.
There is a resizer on the left end too, but it adjusts left end of the segment (but not the right end).
Paste Merge command will merge animations from the clipboard on top of animations already configured for the selected segments. It does not erase the prior selected animations - it will replace them.
In the Grid view, you can select the animations that you want to have merged by the Paste Merge command of Sequencer window. - only selected animations will be merged.
Multiple Animations Segments can be selected (but only on the same Track)
- You can use mouse rubber-banding to select multiple segments
- You can use Shift + mouse click to extend the selection
- You can use Shift + right/left arrow keys to extend the selection to the right/left
- Clicking with the mouse anywhere (without the Shift key being held down) will clear the multiple selection.
- Using the up/dow arrow keys will clear the multiple selection.
Rubber band selections in Sequencer must start with a mouse down click outside of any animation segment - while holding down the mouse button you can drag the mouse to define a rubber banded selection.
By default, Animation segments are NOT selected - you use mouse and/or key presses to select them in the Sequencer window.
Paste and Paste Merge will be applied to all of the segments in a Multiple selection.
Using Variant Editor to Find Interesting Animations
There is a Variants button next to the keyframes in the Sequencer window - that opens a variants window for the keyframe - you can copy animations from the Variants window and paste them on animation segments.
You can Drag from Variants thumbnail and Drop on an animation segment in the Sequencer window.
Grid View windows now have a Copy Segment button so you can copy the current animation segment to clipboard - (can be used for Paste or Paste Merge in Sequencer).
Sequencer Key Commands
Changed the key combination to move to far left/far right segment of track:
- Command+Control+key right/left ===> moves to far right/left animation segment
- Command+Option+ Control+key right/left ===> moves to far right/left end of active sequencer area.
- Shift+ key right/left ===> extends the segment selection
- key right/left ===> move to next/previous segment
Saving animation segment offset/duration in Tick units which is defined to be 3840 ticks per whole note.
Locators
You can render a narrowed range of video frames by either:
- setting the locators on the sequencer to the correct frame range OR
- in the Video Render window, you change change the Start and Count values in the Frame Range to Render box. (The first video frame is numbered 0.)