Fractal Architect 4 Help Index

Applies to:FA 4
Fractal Architect has always supported transparent background renders for users interested in creating composite images, where a fractal is combined with another image.
Previously, this app did not support compositing inside the app, but now it does. You now have a choice of Render modes that make it possible for you to explore the world of transparent background fractals and image compositing.
Composited images created from transparent renders are very different from the original fractal images.
When composited over a white background, the output images have very soft pastel colors, and really look like hand-painted water-color paintings.
The app introduces a new fractal parameter: AlphaGamma, which is only applicable to transparent renders. It also now supports variable radius Density Estimation, a technique to hide statistical sampling noise. When rendering fractals on top of a light background, this small enhancement is very helpful.
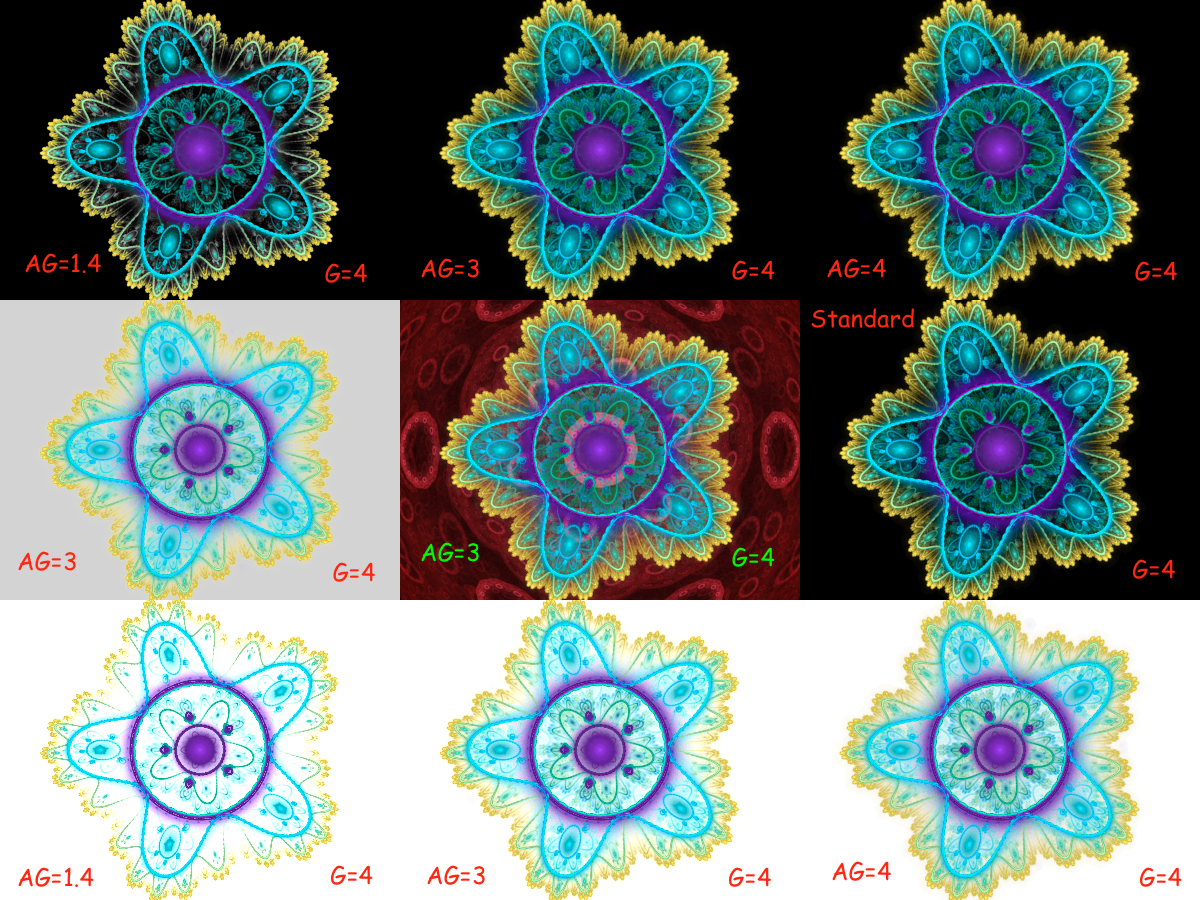
Here is a tiled image showing 9 different Render mode settings for the same fractal.
8 of these images use transparent background render. 1 of them is the original Standard render mode fractal.
All of them had the ordinary fractal Background color parameter set to Black.

1. Composite over Black, AlphaGamma=1.4, Gamma=4, DE Radius=7
2. Composite over Black, AlphaGamma=3,   Gamma=4, DE Radius=7
3. Composite over Black, AlphaGamma=4,   Gamma=4, DE Radius=7
4. Composite over Gray,  AlphaGamma=3,   Gamma=4, DE Radius=7
5. Composite over Image, AlphaGamma=3,   Gamma=4, DE Radius=7
6. Standard,             AlphaGamma=4,   Gamma=4, DE Radius=7
7. Composite over White, AlphaGamma=1.4, Gamma=4, DE Radius=7
8. Composite over White, AlphaGamma=3,   Gamma=4, DE Radius=7
9. Composite over White, AlphaGamma=4,   Gamma=4, DE Radius=7

As you can see, for this fractal, Standard mode renders with three different Background colors give similar results.
What you lose:
1) No AlphaGamma adjustment 2) No Choice of ordinary fractal Background color. It does matter. The normal Background color does impact the composited fractal appearance.
These are all composited on a White Background, but the normal Background color fractal parameter is different.

Here we have a fractal with a dark textured background. This example shows the importance of the AlphaGamma setting, as it has a very strong affect on the final image.

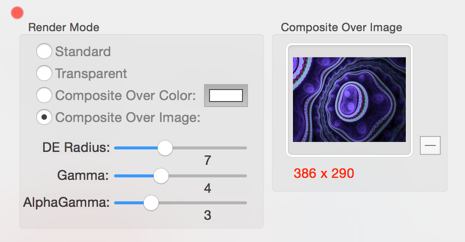
These parameters are available on the Render Mode popover.
Gamma: affects the overall contrast in the image. Normally, no change is needed for transparent vs non-transparent renders for this parameter.
AlphaGamma: affects how much of the fractal is considered transparent or not. This parameter controls how much low density regions of the fractal obscure the background color or image.
Thinking of islands emerging from the sea as an analogy, the height of the sea relative to the land is determined by the AlphaGamma parameter.
Lower values of Alpha-Gamma hide more of the fractal, while higher values expose more of the low density regions.
A rule of thumb: a good default AlphaGamma setting is 3/4 of the Gamma setting.
For non-transparent renders (all composited renders are transparent), AlphaGamma has no effect on the final image. It only influences the output Alpha mask of the image. Subsequent compositing operations use the Alpha mask to create the final image.
Density Estimation Radius : affects the appearance of very low density regions. DE filtering is used to hide random sampling noise in parts of the image which receive few hits. In most images, Density Estimation filtering improves the image, but in some you get ugly artifacts.
Density Estimation artifacts can be very prominent on top of light background colors. Reducing the DE radius might improve the image. Adjusting the Gamma parameter helps too. AlphaGamma can make the artifacts “sink beneath the sea” and become invisible.
Even if you are not interested in composite/transparent rendering, transparent rendering can improve some tough, hard to render images that have ugly DE artifacts.
Use the Composite Over Color render mode and pick the same color for the Composite background color as the ordinary fractal background color. Adjust the AlphaGamma until the artifacts “melt away” or “sink beneath the sea”.
The term Transparent Render refers to rendering a fractal with the background color’s alpha component set to 0.
A term commonly used in Image Editing is: Alpha Mask. That is a grayscale image created by splitting out the Alpha channel from a RGBA image.
Fractal Architect uses the common practice of creating an Alpha Mask based on the Luminance of each pixel. With Scott Drave’s Flame fractal algorithm, luminance of each pixel is directly related to the histogram intensity (or height) for each pixel.
A gamma reduction is applied to the histogram values for each pixel using the Gamma fractal parameter value. The output alpha channel is calculated using the AlphaGamma parameter instead of the Gamma parameter.
The calculated alpha values created by this algorithm become the output image’s alpha channel for transparent renders. Standard renders simply set the alpha channel to 1, effectively ignoring the calculated alpha mask.
There are 4 render modes:
Standard
Transparent
Composite over Color
Composite Over Image
This render mode creates images that are non-transparent.
This render mode creates images that have an Alpha Mask. Use this setting if you want to perform compositing in another application.
For example, you might create transparent video frames and then composite those video frames on top of a background created in an app like Adobe After Affects or Apple Motion.
The Alpha channel value for each pixel is directly related to the histogram density for that pixel.
Preview images shown inside the app will display a light grey hatch pattern in the transparent portions of the image. When doing the final render to file, the hatch pattern is not included. The hatch pattern makes it easier to see what portions of the image are transparent.
This render mode does a transparent render and composites the fractal on top of a solid color background.
The Composite Color parameter specifies the compositing background color (not the same as the ordinary fractal background color).
When compositing over a white background, you can see what portions of the image are opaque versus what portions are transparent.
This render mode does a transparent render and composites the fractal on top of a background image that you provide.
The Background Image parameter is the image that will be used as the background for the compositing operation.
You can drag and drop image files onto the thumbnail image well found in the Render Mode settings popover.
You can also use Copy and Paste from another application.
Copy the image from say Photoshop using Edit > Copy.
Click on the thumbnail image well in the Render Mode.
Use Edit > Paste to paste the image.
The images are “grabbed” by Fractal Architect and saved inside the fractal file.
They are saved at the same resolution. This is important to remember.
Say you drop a background image with resolution 400x300. Then you render a composite at resolution 1200x900. The background image will appear pixelated.
To remind you of this, the resolution of the background image is shown in the Render to File dialogs.
In a file with multiple keyframes, each fractal has its own Render mode settings.
The keyframes window can show keyframes all having a different Render modes.
Each animation segment has its own render mode, that is saved.

The Render Mode settings are available throughout the app. In most places there is a Render Mode button that opens the Render Mode popover.
You can freely change the Render Mode for a random batch.
Lets say you created a batch with Standard render mode.
To see how they look with Composite over Color, simply set that mode in the Render Mode popover. Then re-render that random batch again clicking on the small Re-render button icon, found on the bottom right corner of the window.
The output render mode for the cross-bred fractal is determined by the settings set in Render Mode settings popover. You can cross-breed 2 keyframes with different input render modes. Those modes are ignored - only the output render mode settings are used.
Similar to the cross-breeder, the output video frames use the Render Mode settings set in the Segment configurator, not the input keyframe render mode settings.