Fractal Architect 4 Help Index
Applies to:FA 4
The triangle editor allows you to control the appearance of your fractal by defining the fractal’s component transforms.
Tutorial: Cross Breeder Tutorial
See also: Render Direct to Video
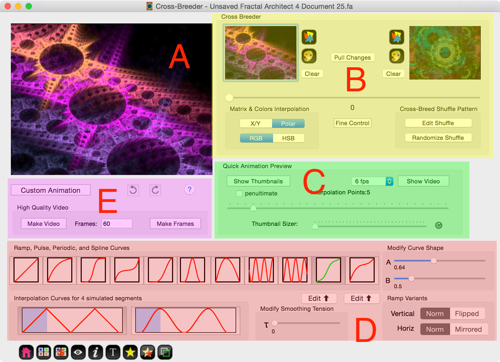
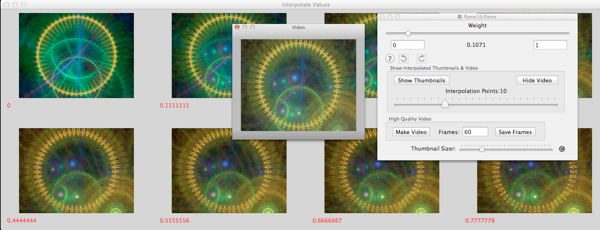
A. Cross Breeding Result Thumbnail
B. KeyFrames and Breeding Amount Slider
C. Cross Breeding Interpolation Controls
D. Interpolation Curve Controls
E. High Quality Video Controls
F. Save Animation Frames to a Flame file
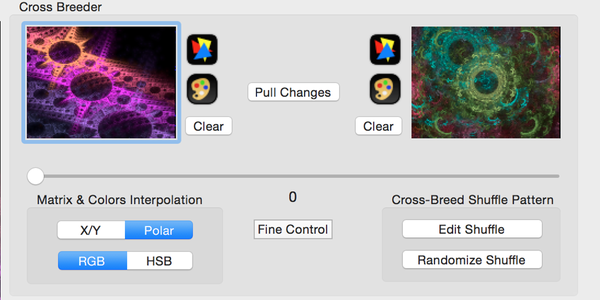
Use either drag & drop or cut & paste to setup the keyframes. You can choose any thumbnail from elsewhere in the application or select a Flame file from the Mac Finder to populate a keyframe.
You can open the Triangle editor or the Color Gradient and make changes to the keyframes. After editing them, make sure you click the Pull Changes button so the Cross-breeder gets the changed keyframes.
The slider controls the amount of the morph between the two keyframe fractals.
New ! If you click the Fine Control button, a popup window with another slider appears. You can adjust the effective magnification amount control slider. Larger number gives you finer control over the affect of the slider’s movement.

These change the way interpolation is done to the transforms’ matrices and to the color values.
New ! Morphing of 3D Camera pitch, yaw, and roll are now done using Spherical Linear Interpolation - so you now have better smooth changes in camera orientation from a morph.
New ! A morph takes the transforms from fractal 1 and transform from fractal 2 and blends them together.
The shuffle permutations are just different arrangements of which transform of fractal1 is blended with which transform of fractal2.
Here the permutation is 1, 2, 3:
| Flame 1 | Flame 2 | |
|---|---|---|
| Xform 1 | ===> | Xform 1 |
| Xform 2 | ===> | Xform 2 |
| Xform 3 | ===> | Xform 3 |
But there are other combinations. For example:
Here the permutation is 2, 3, 1.
| Flame 1 | Flame 2 | |
|---|---|---|
| Xform 1 | ===> | Xform 2 |
| Xform 2 | ===> | Xform 3 |
| Xform 3 | ===> | Xform 1 |
With 3 transforms, there are 6 different shuffle permutations.
The number of permutations for n transforms is: n! or n factorial.
n factorial is defined to be: n * (n - 1) * (n - 2) … 2, 1
So:
if n = 3, n! = 3 * 2 * 1 = 6
if n = 4, n! = 4 * 3 * 2 * 1 = 24
With the these two fractals each have 6 transforms to be morphed together. There are 720 different shuffle combinations where the right transform can be morphed with a transform on the left. The number of combinations is n factorial (6! = 720). If there are only
You will get a different morph animation with each shuffle combination. So in this example, you get 720 different morph animations from just 2 keyframes!
The default shuffle pattern is for the 1st left transform to be morphed to the 1st on the right, 2nd left to 2nd right, …
New ! First, set the crossbreeding amount slider close to 0.5. That way you can see middle of the animation.
You can click the Edit Shuffle button to select a shuffle combination manually which is a unique ordering of the 6 rows in this case of 6 transforms. Click and drag rows with the mouse to change the row ordering.
You can click Randomize Shuffle button to randomly pick one of the permutations.

You can show a number of thumbnail images with different interpolated values.

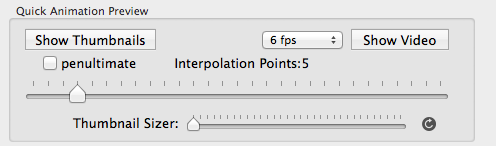
First, set the Interpolation Points to the desired number of thumbnails images to show. Next click on the Show Thumbnails button.
Tip: You can first open it with a small number of points to see if the parameter has much affect on the image. If it does, you may reopen it a second time with more thumbnails.

Use the sizing slider to select a new size, then press the redraw button.
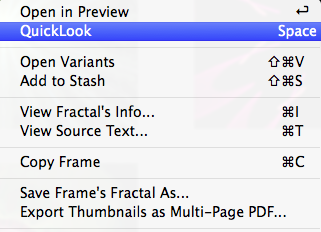
Click the thumbnail image with the mouse to select it. Press the Return to open the Preview window or use the the right mouse button activated context menu to open it.
Click the thumbnail image with the mouse to select it. Press the spacebar to open the Quicklook view or use the the right mouse button activated context menu to open it.
Click the thumbnail image with the mouse to select it. Use the the right mouse button activated context menu to open it.
Click on the thumbnail image to select it. Next right click on the thumbnail and select the “Save Selected Frame’s Fractal” menu item.
Below each image the actual parameter’s value is shown in red. Click the desired thumbnail image with the mouse to select it. Press the Return key to set the parameter’s value. Or double-click on the image to set the parameter’s value. The interpolator window will close.
First, set the Interpolation Points to the desired number of thumbnails images to show. Next click on the Show Thumbnails button. Finally click on the Show Videobutton. In a moment a video containing the interpolated thumbnail images will be shown.
- Ramp
- Curve starts at the right keyframe and ends at the left keyframe.
- Pulse
- Curve starts at the right keyframe goes to the left keyframe, and then returns to right keyframe.
- Periodic
- Curve cycles back and forth between the keyframes.
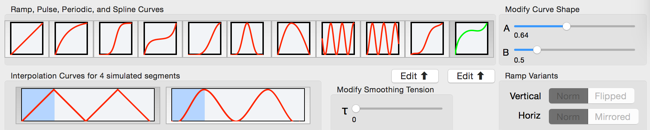
Curves affect the interpolated parameter values. The default Linear Ramp curve interpolates linearly from start to end parameter values.
The bottom of the curve box represents the left keyframe flame fractal. The top represents the right keyframe flame fractal.
- Linear Ramp (default)
- Not effected by A or B curve shape parameters.
- Exponential Ramp
- Affected by just A curve shape parameter.
- Tanh Ramp
- Affected by just A curve shape parameter.
- Sinh Ramp
- Affected by just A curve shape parameter.
- Cos Half-Power Ramp
- Affected by just A curve shape parameter.
- Cos Power Pulse
- Affected by just A curve shape parameter.
- Skewed Cos Power Pulse
- Affected by both A and B curve shape parameters.
- Sin Periodic
- Affected by both A and B curve shape parameters.
- Cos Periodic
- Affected by both A and B curve shape parameters.
- Catmull 2D Spline
- New ! Use the Edit button to open the curve editor.
- B-Spline 2D
- New ! Use the Edit button to open the curve editor.
The affect of the Smoothing over 4 concatenated animation segments is shown in the graphic.
- None
- No smoothing is applied.
- Smooth
- Catmull-Rom spline smoothing. Tension (tau) parameter applies.
You can flip a curve upside-down or mirror it horizontally. This can be used to reverse the animation.
- Norm
- No change to animation order.
- Flipped
- Curve is flipped upside-down.
- Mirrored
- Curve is mirrored horizontally.
New ! This curve editor allows you to create your own custom curve for the morph amount.
Catmull curves first and last control points (the green points) do not lie on the curve, but still influence the curve’s shape.

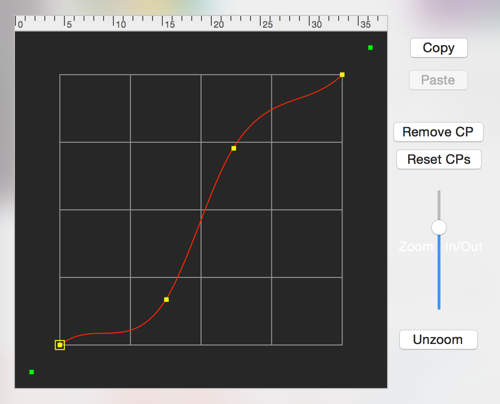
Click on the red line with the mouse to add a new point and then drag it to shape the curve. If you click on top of an existing point, that point will be selected and can be dragged to shape the curve.
The first and last control points are hidden and can be revealed by zooming out the curve editor. They are the green points. The 2nd and next-to-last points in the curve can only be dragged along the X and Y axes of the graph.
New ! This curve editors allows you to create your own custom curve for the morph amount.
B-splines are a free from curve that tends to have smoother curves than Catmull curves.
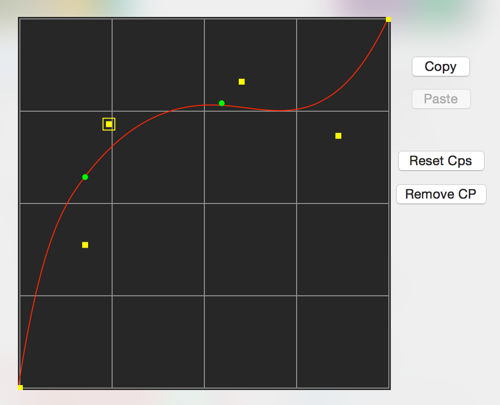
Click on the graph with the mouse to add a new point and then drag it to shape the curve. If you click on top of an existing point, that point will be selected and can be dragged to shape the curve.
With B-splines, only the first and last control points lie on the curve. The rest help shape the curve.
The first and last points in the curve can only be dragged along the X and Y axes of the graph. Unlike the Catmull curve editor, there is no zoom control as there are no hidden control points.