Fractal Architect 5 Help Index
Render State Panel
Applies to:FA 5

Tutorials: Basic Rendering & Advanced Rendering
Article: Supersampled Rendering
Concepts
Flame Algorithm - what its doing
The Flame algorithm begins with a pool of totally random points in space.
The following iterative calcuation is done: quality X width X height times:
A random point is selected from that pool.
One of the fractal’s Transforms is randomly selected. (Transform weight determines the probability that a particular Transform is selected.)
A new point location is calculated for the point by transforming the points location by:Applying the pre-transformation operation to the point
Using the transform equation, a new point location is calculated.
(Optional) Applies the post-transformation operation to the point.
If the new point location falls inside the fractal viewport (visible part of the fractal), a Hit is recorded on the fractal Histogram. This Histogram is largest piece of render state and can be saved to disk. This is the time consuming part of the render process and can literally end up being done a million times or more.Density Estimation is a step that tries to remove noise from the final rendered image, by blending the low density areas of the histogram.
Post processing is the final step that converts the histogram to the final image.
The final image quality is dependent on the Quality setting. Higher quality means more iterations. In the old days, you would have to repeat the entire render to get a higher quality image. Guessing the best Quality setting was an art.
Render Tiling
The render process consumes a lot of memory to hold the Histogram and the final image. If there is insufficient memory available to render the specified image size, the image is broken into smaller tiles that are rendered one at a time. These tile images are then combined to create the final image.
The number of tiles required depends on the amount of free memory available on the Mac at the start of the render and the size of the final image.
Render to Completion - Normal operation
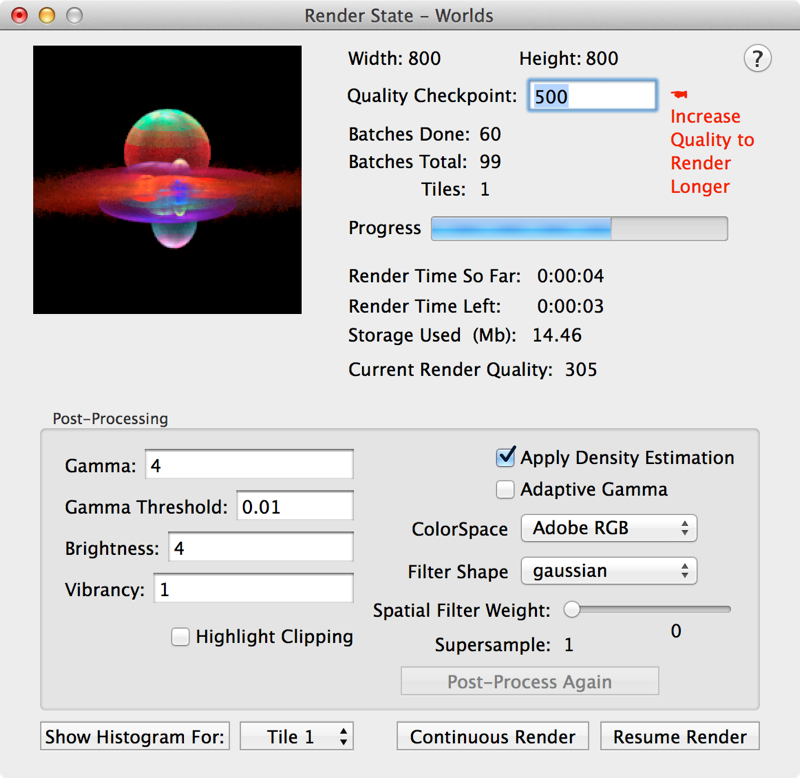
If you start a render and let it run to completion, complete render state is saved. You can add more Quality to the render later using the Render State window that opens.
Continuous Rendering
An alternative approach to getting higher quality images is to choose Continuous Rendering.
Continuous rendering renders continuously from one Quality checkpoint to the next. The Quality checkpoints are at:
500, 1000, 2000, 3000, …
At each checkpoint, the fractal image is updated and the prior quality/current quality images are show in a double paned window. The left pane is the higher quality rendering and the right pane is the lower quality rendering.
The render never stops until you tell it to and then it will stop at the next checkpoint.
Pause and Resume Render
If you start a render you can click the Pause Render button to stop the render and have the render state saved to disk.
You can quit the application and at some time in the future, restart the application and open the saved RenderState file. Clicking on the Resume Render button of the Render State panel will resume the render.
You can let it run to completion or interrupt the render by pressing Pause Render again.
Recharge Quality - Add more Quality
If you have Complete render state saved to disk, you may add more quality to the render.
For example, lets say you chose to render a file at 300 quality. A Render State window will pop up and show the render progress. You wait for the render to complete and inspect the rendered image. If the image quality is not good enough, you can add more Quality and resume the render again.
So lets say you change the quality to 600, the render will resume and 300 more quality will be added to the render.
Post Processing
If you have the Complete render state and the render is finished, you can change the post processing related fractal parameters and post-process again. Since you have the complete fractal render state, post-processing is quick. Most frequently, you would adjust Gamma Threshold and turn on/off the Density Estimation step.
Post-Processing Related Parameters
- Gamma
- Effects conversion from histogram units to actual color pixel values. Logarithmically scales hits to luminosity. Normal range 2 to 4.
- Gamma Threshold
- Linearized hit-to-luminosity gamma conversion threshold. Usually a very small positive fraction. Normal range 0. to 0.02
- Brightness
- Effects overall image brightness.
- Vibrancy
- Effects color saturation. Small values desaturate the image colors. Normal range 0 to 1
- Density Estimation
- Turns on/off Density Estimation portion of Flame algorithm.
- Highlight Clipping)
- Clips over saturated colors (that would otherwise end up as an incorrect color). Related to the Flam3 rendering parameter: Highlight Power.
- Adaptive Gamma
- Adaptive Gamma that when enabled compensates for the gamma reduction due to points being lost in the rendering process.
- Colorspace
- Colorspace allows you to override the default colorspace.
- Spatial Weight Filter
- Supersample reduction filter. Affects how multiple pixel values are reduced to one.
- Spatial Filter Shape
- Spatial filter shape determines the filter type used by the image resampler.
- Supersample
- Shows the supersampling multiplier setting used to render the image (non-editable at this point in the render process).
Where is the Saved Render State stored
There is a new file type (whose file ending is .flrs) that holds the render state. Render state can be large, usuallly about 5X the size of the final image.
Viewing the Histogram(s)
Click the Show Histogram button to open the Histogram window. If there are multiple tiles, first select the Tile to view, then click the button.