Fractal Architect 5 Help Index
![]()
Preview Editor
Applies to:FA 5
See Also: 3D Camera & 3D Flythroughs
See Also: 3D Viewing Parameters
The Preview Window
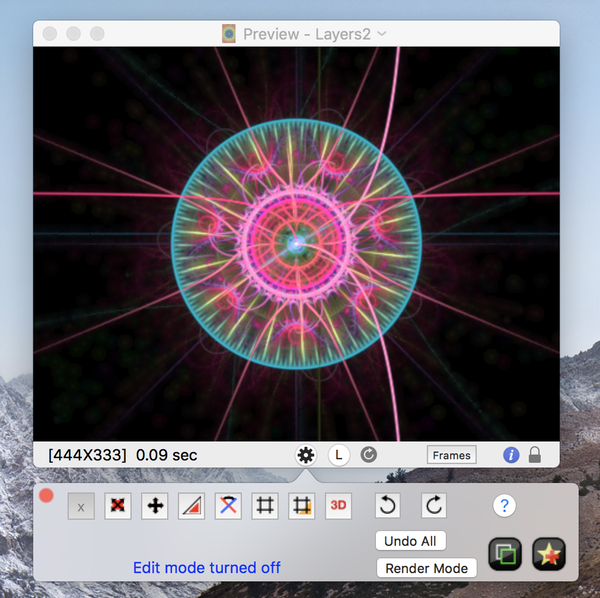
The preview edit controls allow you to modify the flame fractal View Camera settings, similar to a photo editor.
They are revealed by clicking on the triangle in the middle of the Preview window’s status bar.
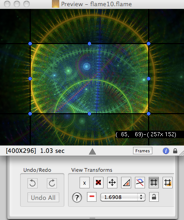
Preview Editor Controls

The Editor controls are grouped into two different sets: Undo/Redo and View Transforms
The View Transform mode selector (the row of buttons on top) allow you to select different edit modes.
With these modes, you can translate, scale, rotate, crop, and resize the fractal image.
The Undo/Redo controls allow you to undo view camera setting changes one at a time. You can also discard all changes with Undo All.
- x
- Inactive edit mode

- Combined - translate, scale, and rotate - edit mode

- Translate only (move the fractal around) edit mode.

- Scale only (zoom in - zoom out) edit mode.

- Rotate only edit mode.

- Crop edit mode.

- Expand window edit mode.

- 3D edit mode.
Preview Window Layer Panel
Another approach to creating a layered fractal is to use the Preview window’s Layerz popover.
Open the Layerz popover by clicking the L button.
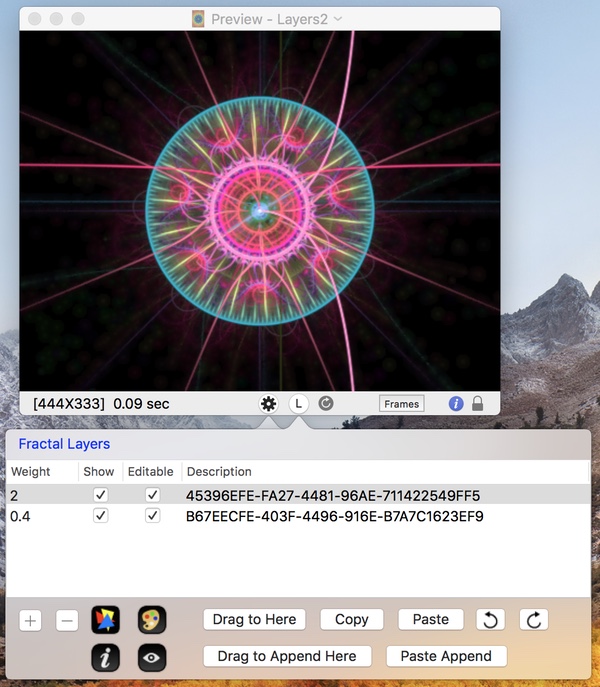
Fractal Layers Table
This table has one row per layer.
- Weight
- Layer weight.
- Show
- Shows this Layer.
- Editable
- When checked, Preview edit operations affect this layer.
- Description
- Shows the fractal Uuid for that layer.
Layers Popover Controls
- +
- Adds a new empty layer.
- -
- Removes the selected layer.
- Triangle Editor button
- Opens the Triangle editor for the selected layer.
- Gradient Editor button
- Opens the Gradient editor for the selected layer.
- Info button
- Opens an Info window for the selected layer.
- Quicklook button
- Opens a Quicklook window for the selected layer.
- Drag to Here
- Drag a fractal to here and drop it overwrites the fractal for this selected layer.
- Copy
- Copies to the pasteboard the fractal for this selected layer.
- Paste
- Paste overwrites the fractal for this selected layer.
- Undo
- Undoes the last layers edit operation.
- Redo
- Redoes the last undone layers edit operation.
- Drag to Append Here
- Drag a fractal to here and drop it appends a new layer.
- Paste Append Here
-
Paste appends a new layer.
Using the Preview Editor
How can I modify the flame rendering camera viewport settings?
Each flame fractal is rendered in into a flame coordinate system. The view shown in the preview window is the flame contents visible through a “camera viewport”. The camera viewport settings are stored in the flame fractal document and initially set by the fractal editing program that created the flame fractal.
Fractal Architect allows you to change the camera view settings using techniques similar to photo image editors like iPhoto and Photoshop. Judicious editing of the view properties can result in much better, more artistic images.
The editor allows you to:
- move the fractal around inside the window
- rotate the fractal image
- zoom in and out of the fractal image
- crop the fractal image
- expand the window around the fractal
(without resizing/stretching the image)
Each preview window has a drawer full of view editing mode options and controls. In the middle of the status bar below the image, is a triangle shaped button. Clicking it opens or closes the view editor drawer. The drawer is either opened either below the window or to its right. (It can open on other sides, if there is not space below or beside the window.)
The editor has 7 modes of operation. Each specific mode is set by clicking on the appropriate toggle mode button in the View Transforms box. The editor modes are:
- x
- Inactive edit mode
- Combined - translate, scale, and rotate - edit mode
- Translate only (move the fractal around) edit mode.
- Scale only (zoom in - zoom out) edit mode.
- Rotate only edit mode.
- Crop edit mode.
- Expand window edit mode.
- 3D edit mode.
Move Fractal Around the View
Select either the translate-only or the combined edit mode: . Left click the mouse and drag the image to the new location.
Zoom the Fractal in/Out of View
Select either the scale-only or the combined edit mode.
Alternate 1:
Left click the mouse and drag the zoom line around. Under combined mode, hold the Shift key while dragging the mouse.
The zoom line is anchored on the scale center anchor point - the point in the image where the image is zoomed in/out around. The change in length of the zoom line determines the scale factor. Longer zoom line zooms into the fractal, shorter line zooms out. The current scale factor is shown in the bottom right corner of the image. This is the most precise alternative.
Alternate 2:
Use the middle mouse button wheel to zoom in/out. Scrolling the wheel away from you zooms out. Scrolling the wheel toward you zooms in. The current scale factor is shown in the bottom right corner of the image.
Alternate 3:
Use the pinch in-out trackpad touch gesture to zoom in/out of the fractal.
How do i move the anchor point in rotate, zoom and combined edit modes?
The anchor point determines the point in the fractal that is either used to zoom the view in/out around or used to rotate the view around.
Left mouse click and drag the red anchor point to another spot. Use the Center button to re-center the anchor point in the window.
Rotate the Fractal View
Select either the rotate-only or the combined edit mode.
Alternate 1:
Left click the mouse and drag the rotate axis line around. Under combined mode, hold the Command key while dragging the mouse.
The rotate line is anchored on the rotation center anchor point - the point in the image where the image is rotated around. The current rotation amount is shown in the bottom right corner of the image. This is the most precise alternative.
Alternate 2:
Use the rotate trackpad touch gesture to zoom in/out of the fractal.
How do i move the anchor point in rotate, zoom and combined edit modes?
The anchor point determines the point in the fractal that is either used to zoom the view in/out around or used to rotate the view around.
Left mouse click and drag the red anchor point to another spot. Use the Center button to re-center the anchor point in the window.
Combined (Translate/Rotate/Scale) Edit Mode
This edit mode uses key modifiers with a left mouse button drag operation to determine whether to translate, scale, or rotate the fractal.
Translate: Drag the fractal by holding down the left mouse button while moving the cursor. With a trackpad, press and drag a finger on the surface to move the fractal.
Zoom: Press the Shift key while dragging the left mouse button to zoom the fracal in/out.
Alternatively, rolling the middle mouse wheel also zooms the fractal view in or out. With a trackpad, use the pinch gesture to zoom in/out.
Rotate: Press the Command key while dragging the left mouse button to rotate the fractal. With a trackpad, use the rotate gesture to rotate the fractal.
How do i move the anchor point in rotate, zoom and combined edit modes?
The anchor point determines the point in the fractal that is the center of zoom or rotation. Left mouse click on and drag the red anchor point to another spot. Use the Center button to re-center the anchor point in the window.
Crop the Fractal View
First use the mouse left button to click-drag the initial crop rectangle. Then adjust the crop rectangle’s size and location as desired. The crop rectangle’s aspect ration and horizontal/vertical orientation can be modified too.
To perform the crop, either press the enter key on the keyboard or double-click the left button anywhere in the window.
To cancel the crop (and remove the crop rectangle) press the “esc” or escape key on the keyboard.
To undo the crop, click the Undo button.
How can I adjust the crop rectangle before the actual crop is done?
Moving the crop rectangle.
Left click the mouse anywhere inside the crop rectangle and drag it to another location. Alternatively, use the arrow keys on the keyboard to move it around. (However, if one of the sizing hotspots around the rectangle have been selected, the arrow keys resize the crop rectangle.) Note: the arrow keys move the rectangle by 10 pixels each press. Holding down the shift key and pressing the arrow keys will move the rectangle by a single pixel.
Selecting a resize hotspot
Left click on a hotspot with the mouse. Alternatively, press one of the number keys. The arrangement of the number keys on a full keyboard with a number pad shows which number represents each hotspot.
Deselecting the resize hotspot
Left click anywhere in the window. Press either the number 5 or 0.
Resizing the crop rectangle
Left click on one of the sizing hotspots on the crop rectangle, then drag with the mouse to resize the rectangle.They are found in each corner and the middle of each size of the rectangle.
Alternatively select a hotspot with either mouse or keyboard. Then use the arrow keys to resize the crop rectangle. By default the sides of the crop rectangle resize in 10 pixel increments when resized with the keyboard. Hold the shift key down to resize in increments of a single pixel.
How can I switch the crop rectangle from horizontal to vertical orientation?
Click on the horizontal/vertical orientation button to the left of the pop-up aspect ratio menu button. 

How can I set a specific aspect ratio for the crop rectangle?
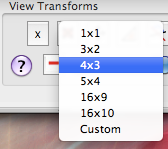
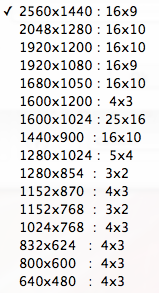
There is a pop-up menu button in the View Transforms box. Clicking on it opens a menu showing several standard aspect ratios. Click on one of the these, or click on the Custom item to open the Custom aspect ratio dialog.
Note: to save space the Horizontal/Vertical orientation toggle button determines whether horizontally or vertically oriented aspect ratios are shown. For instance, the ratio 4x3 (horizontal) becomes 3x4 in the vertical orientation.
The crop rectangle is immediately adjusted to new aspect ratio. To prevent resizes of the rectangle from changing the aspect ratio, make sure the lock/unlock aspect ratio toggle button is set to the locked state. It sits next to the aspect ratio pop-up menu button.
How can I choose a custom aspect ratio?
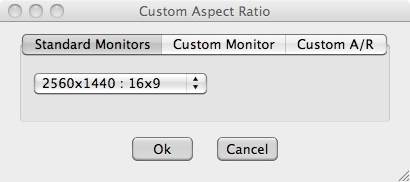
There is a pop-up menu button in the View Transforms box. Clicking on it opens a menu showing several standard aspect ratios. Click on one of the these, or click on the Custom item to open the Custom aspect ratio dialog.
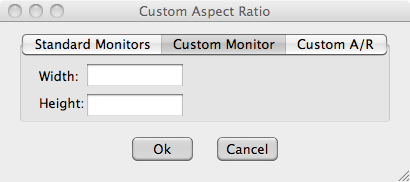
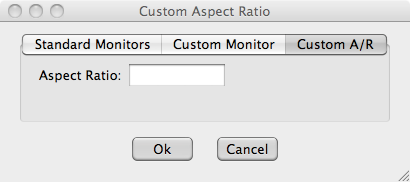
The Custom aspect ratio dialog box offers 3 ways to specify the aspect ratio: Standard Mac monitor sizes, Custom monitor size, or Custom Aspect ratio. The first two choices make it easy to pick an aspect ratio that matches that of many monitors.
Resize the Fractal View Window Allowing the Fractal to Grow and Shrink
This should be fairly obvious. Just click and drag the resize button on the bottom right corner of the preview window. The fractal preview will re-render for the new size.
There is an aspect ratio lock/unlock toggle button next to the resize button. If locked, then the current aspect ratio will be maintained across resizes. When unlocked, the window can be resized freely.
Resize the Fractal View Window Without Changing the Fractal’s Magnification
The far right edit mode selection button starts an edit mode that changes the window resize behavior. The window size can be changed without stretching the fractal to fit the window (standard Fractal Architect behavior). This allows you to see the area around a fractal image that was previously not visible.
Modify the 3D Camera
The 3D camera controls are opened by clicking this button.
This is a deep topic covered in these pages:
See Also: 3D Camera & 3D Flythroughs
See Also: 3D Viewing Parameters
Undo/Redo Changes Made to the View Camera
How can I undo/redo my edits? Can I discard all changes?
These view camera edit changes when saved will change the view settings in the original flame file. You can undo/redo individual changes by clicking the undo or redo buttons (or the Edit->Undo or Redo menu items). You can discard all edit changes by either clicking the Undo All button or using the Edit >Revert Current Frame menu item.
Saving Changes Made to the View Camera
How do I save the my edits and overwrite the flame file’s view settings?
Use the File->Save or File->Save As menu items. The first choice overwrites the flame recipe file. The second choice allows you to save the file to different location and/or with a different file name.